 Message field
The Message Field configuration page provides comprehensive settings organized into tabs for easy navigation.
Configuration Tabs
The settings are organized into the following tabs:
- Content - Configure message title, body, and enable Velocity templates
- Display - Set message type, colors, icons, and display options
- Conditions - Define when the message should be shown (date/time, JQL, screens, statuses, linked issues)
- Permissions - Control which users can see the message
- JavaScript - Add custom code for dynamic interactions
- Delegation (Admin only) - Allow non-admin users to manage the configuration
- Configuration Tabs
- Copy Settings (Admin only)
- Message content
- Display settings
- Conditions for displaying message
- Permissions
- JavaScript
- Delegation (Admin only)
- Testing and Preview
Copy Settings (Admin only)
Before configuring, you can copy settings from another message field configuration:
- Copy settings from - Select an existing message field configuration to copy all its settings
- This is useful when creating similar messages or using an existing message as a template
- After copying, you can modify the settings as needed
Message content
Configure the content and appearance of your message
- Title - Optional field that displays as bold text above the message body. Supports plain text or HTML (HTML is only available for Message type ‘Custom’ when Show as flag is ‘No’).
- Velocity render
- Off (default) - Use plain text or HTML in the message body
- On - Enable dynamic content using Velocity templates with variables like $issue, $context, $formData, and more
- When enabled, messages are regenerated in real-time based on issue data changes
- See Dynamic templates
- Body - The main message content. Can be plain text, HTML, or Velocity template.
- For line breaks, use
<br/>tag - When using Velocity templates, remember to check for null values:
#if($issue.assignee)...#end
- For line breaks, use
- Message Type - One of the predefined types responsible for the color and style of the message.
- Info, Warning, Error, Success, Change
- Custom - For custom styling when predefined types don’t match your needs
- Configure background color, text color, and icon separately
- Use Atlassian color palette or custom hex colors
- Add custom icons from Atlassian icon library
- HTML styling is available when Show as flag is ‘No’
- Info, Warning, Error, Success, Change
- Show as flag
- No - Shows the message as a banner among the fields.
- The position of the message is determined by the position of the field on the screen.
- Yes - Shows the message in a small pop-up on the right side of the screen.
- Regardless of this setting, messages can be exported for printing.
- No - Shows the message as a banner among the fields.
Display settings
Control how the message appears on different screens
- Display settings - Configure field label visibility and message alignment
- Message display options:
- View: show field name. Other: show field name.
- View: show field name. Other: hide field name.
- View: show field name. Other: hide field name and left aligned.
- View: hide field name and left aligned. Other: show field name.
- View: hide field name and left aligned. Other: hide field name.
- View: hide field name and left aligned. Other: hide field name and left aligned.
- View: hide field name. Other: show field name.
- View: hide field name. Other: hide field name.
- View: hide field name. Other: hide field name and left aligned.
- Flag display options:
- Small pop-up - Standard notification in the upper right corner
- Big pop-up - Large dialog window with more prominent display
- Message display options:
* **Screen types:**
    * View - Issue view screen
    * Other - Create, Edit, and Transition screens
* **Notes:**
    * Left aligned - Message aligns with other custom fields
    * Service Desk - All options automatically hide field names
    * Field name is only shown on issue creation screens when configured
Custom CSS Selectors
You can customize the message location on different screens using CSS selectors:
- Service Desk Request Create - Default placement or custom CSS selector
- Service Desk Request View - e.g.,
div.aui-page-header-inner(places message in page header) - Issue Create - Default placement or custom selector
- Issue View - e.g.,
#details-module(activity section),ul.item-details(details section) - Issue Edit - Default placement or custom selector
- Issue Transition - Default placement or custom selector
Examples of useful selectors:
#descriptionmodule- Above description fielddiv[data-test-id="issue.fields.customfield_10018"]- Above specific custom fieldlabel[for="assignee"]+div- Next to assignee field#activitymodule .action-details- In activity section
Note: CSS selectors can use Velocity variables for dynamic placement
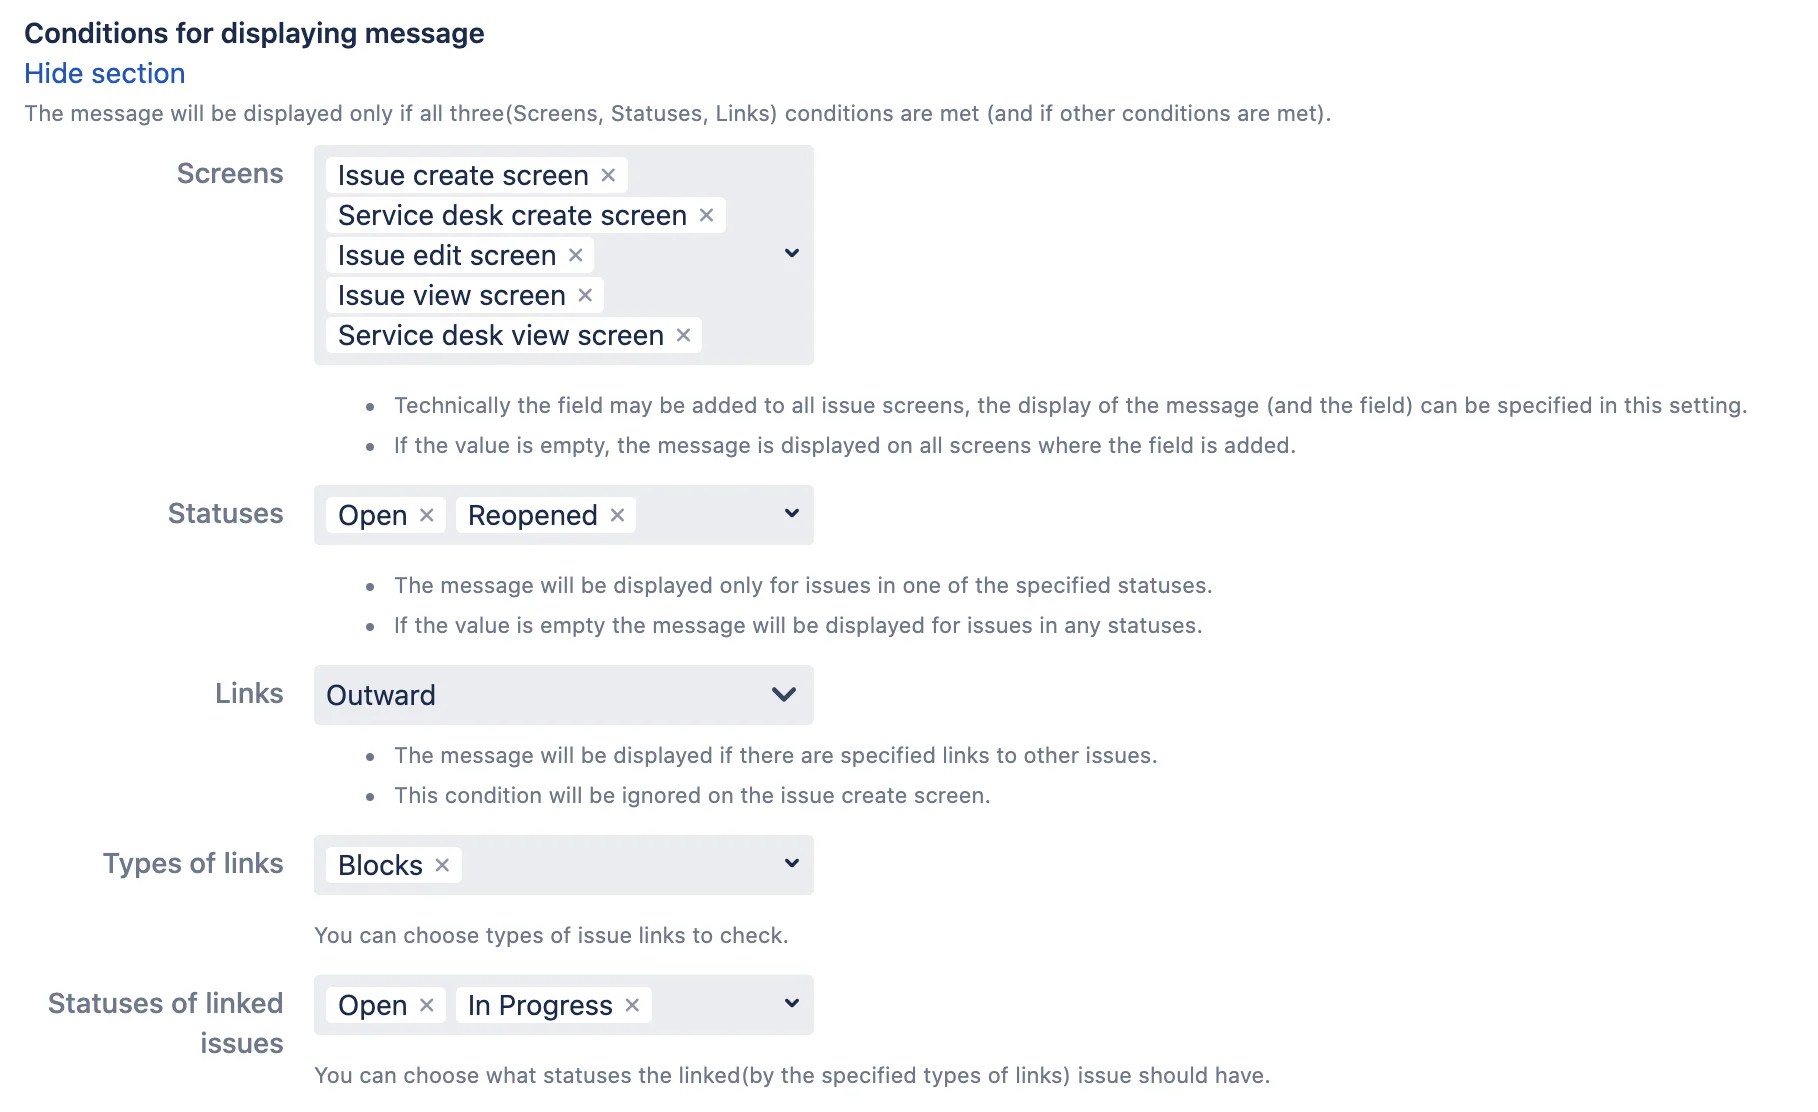
Conditions for displaying message
Configure when and where the message should be displayed
Date and Time Conditions
- Publish at - Set when the message should start displaying
- Uses server timezone
- Leave empty to start immediately
- Message will be hidden before this date/time
- Expire at - Set when the message should stop displaying
- Uses server timezone
- Leave empty for no expiration
- Message will be hidden after this date/time
JQL Condition
- JQL Condition - Display message only for issues matching the JQL query
- The condition checks if the current issue matches:
(JQL Condition) AND key = issue.key - Ignored on issue creation screens (since the issue doesn’t exist yet)
- Leave empty to skip this condition
- Use the “Validate JQL” button to test your query
- The condition checks if the current issue matches:
Screen Conditions
- Issue Screens - Choose specific screens where the message should appear
- Available options: Issue Create, Issue Edit, Transition, Issue View, Service Desk Create, Service Desk View
- Useful when the same field is used across multiple screens but you want to show messages only on specific ones
- Leave empty to display on all screens where the field is configured
- Show only on create screens
- Restricts message display to creation screens only (Issue Create and Service Desk Create)
- Prevents the message from appearing after issue creation, even if requested by Jira or third-party apps
- Works at the system level to ensure messages don’t appear in unexpected places
- Note: This is a technical setting that may still show messages in some edge cases (emails, exports) - contact support if needed
Status Conditions
- Display in statuses
- Show the message only when the issue is in one of the selected statuses
- Leave empty to display for all statuses
- Ignored on issue creation screens
- Don’t display in statuses
- Hide the message when the issue is in one of the selected statuses
- Takes priority over “Display in statuses” - if a status appears in both lists, the message will be hidden
- Leave empty to use only the “Display in statuses” condition
- Ignored on issue creation screens
Linked Issues Conditions
- Linked issues
- Display the message based on issue links
- Options:
- Don’t check link conditions - Disable this condition
- Any - Check all types of links (both inward and outward)
- Inward - Check only incoming links (e.g., “is blocked by”)
- Outward - Check only outgoing links (e.g., “blocks”)
- Ignored on issue creation screens
- Types of links (when link checking is enabled)
- Select specific link types to check (e.g., “Blocks”, “Relates to”, “Clones”)
- Leave empty to check all link types
- Statuses of linked issues (when link checking is enabled)
- Display message only if linked issues are in the selected statuses
- Leave empty to ignore the status of linked issues
Important: The message will be displayed only when ALL enabled conditions are met. This includes date/time, JQL, screens, statuses, and linked issue conditions.
Permissions
Configure which users should see the message based on their login status, groups, and roles.
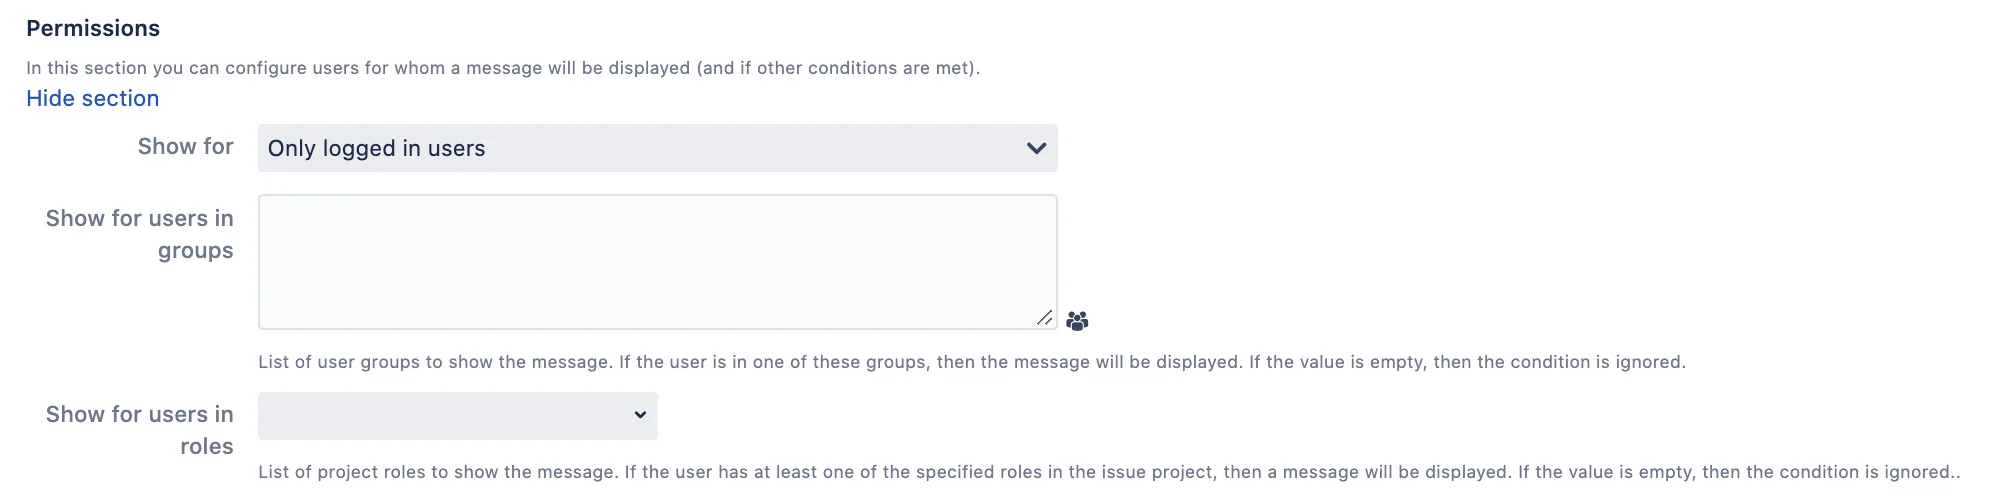
Who can see the message
- Who can see the message (Admin setting only)
- Only logged in users (default) - Only authenticated Jira users
- All users (logged in users and anonymous) - Everyone including anonymous visitors
- Only anonymous users - Only non-authenticated visitors
- Selected users and anonymous - Specific logged-in users (filtered by groups/roles) plus anonymous visitors
Group and Role Filters
When “Only logged in users” or “Selected users and anonymous” is selected:
- Show for user groups
- Display message only to users in the selected groups
- Leave empty to ignore this condition
- The user needs to be in at least one selected group
- Show for users in project roles
- Display message only to users with the selected project roles
- Leave empty to ignore this condition
- The user needs to have at least one selected role in the issue’s project
- Don’t show for user groups
- Hide message from users in the selected groups
- Takes priority over “Show for user groups”
- Leave empty to ignore this condition
- Don’t show for users in project roles
- Hide message from users with the selected project roles
- Takes priority over “Show for users in project roles”
- Leave empty to ignore this condition
How permissions work:
- The Who can see the message setting is always checked first
- If group/role conditions are set, the user must meet at least one “Show for” condition
- “Don’t show” conditions always take priority - if a user matches any “Don’t show” condition, the message is hidden
- When both groups and roles are specified in “Show for”, the user needs to match either a group OR a role (not both)
JavaScript
Add custom JavaScript code to create dynamic interactions with form fields and customize message behavior.
Note: Most dynamic content needs can now be handled using Velocity templates , which are easier and safer to use.
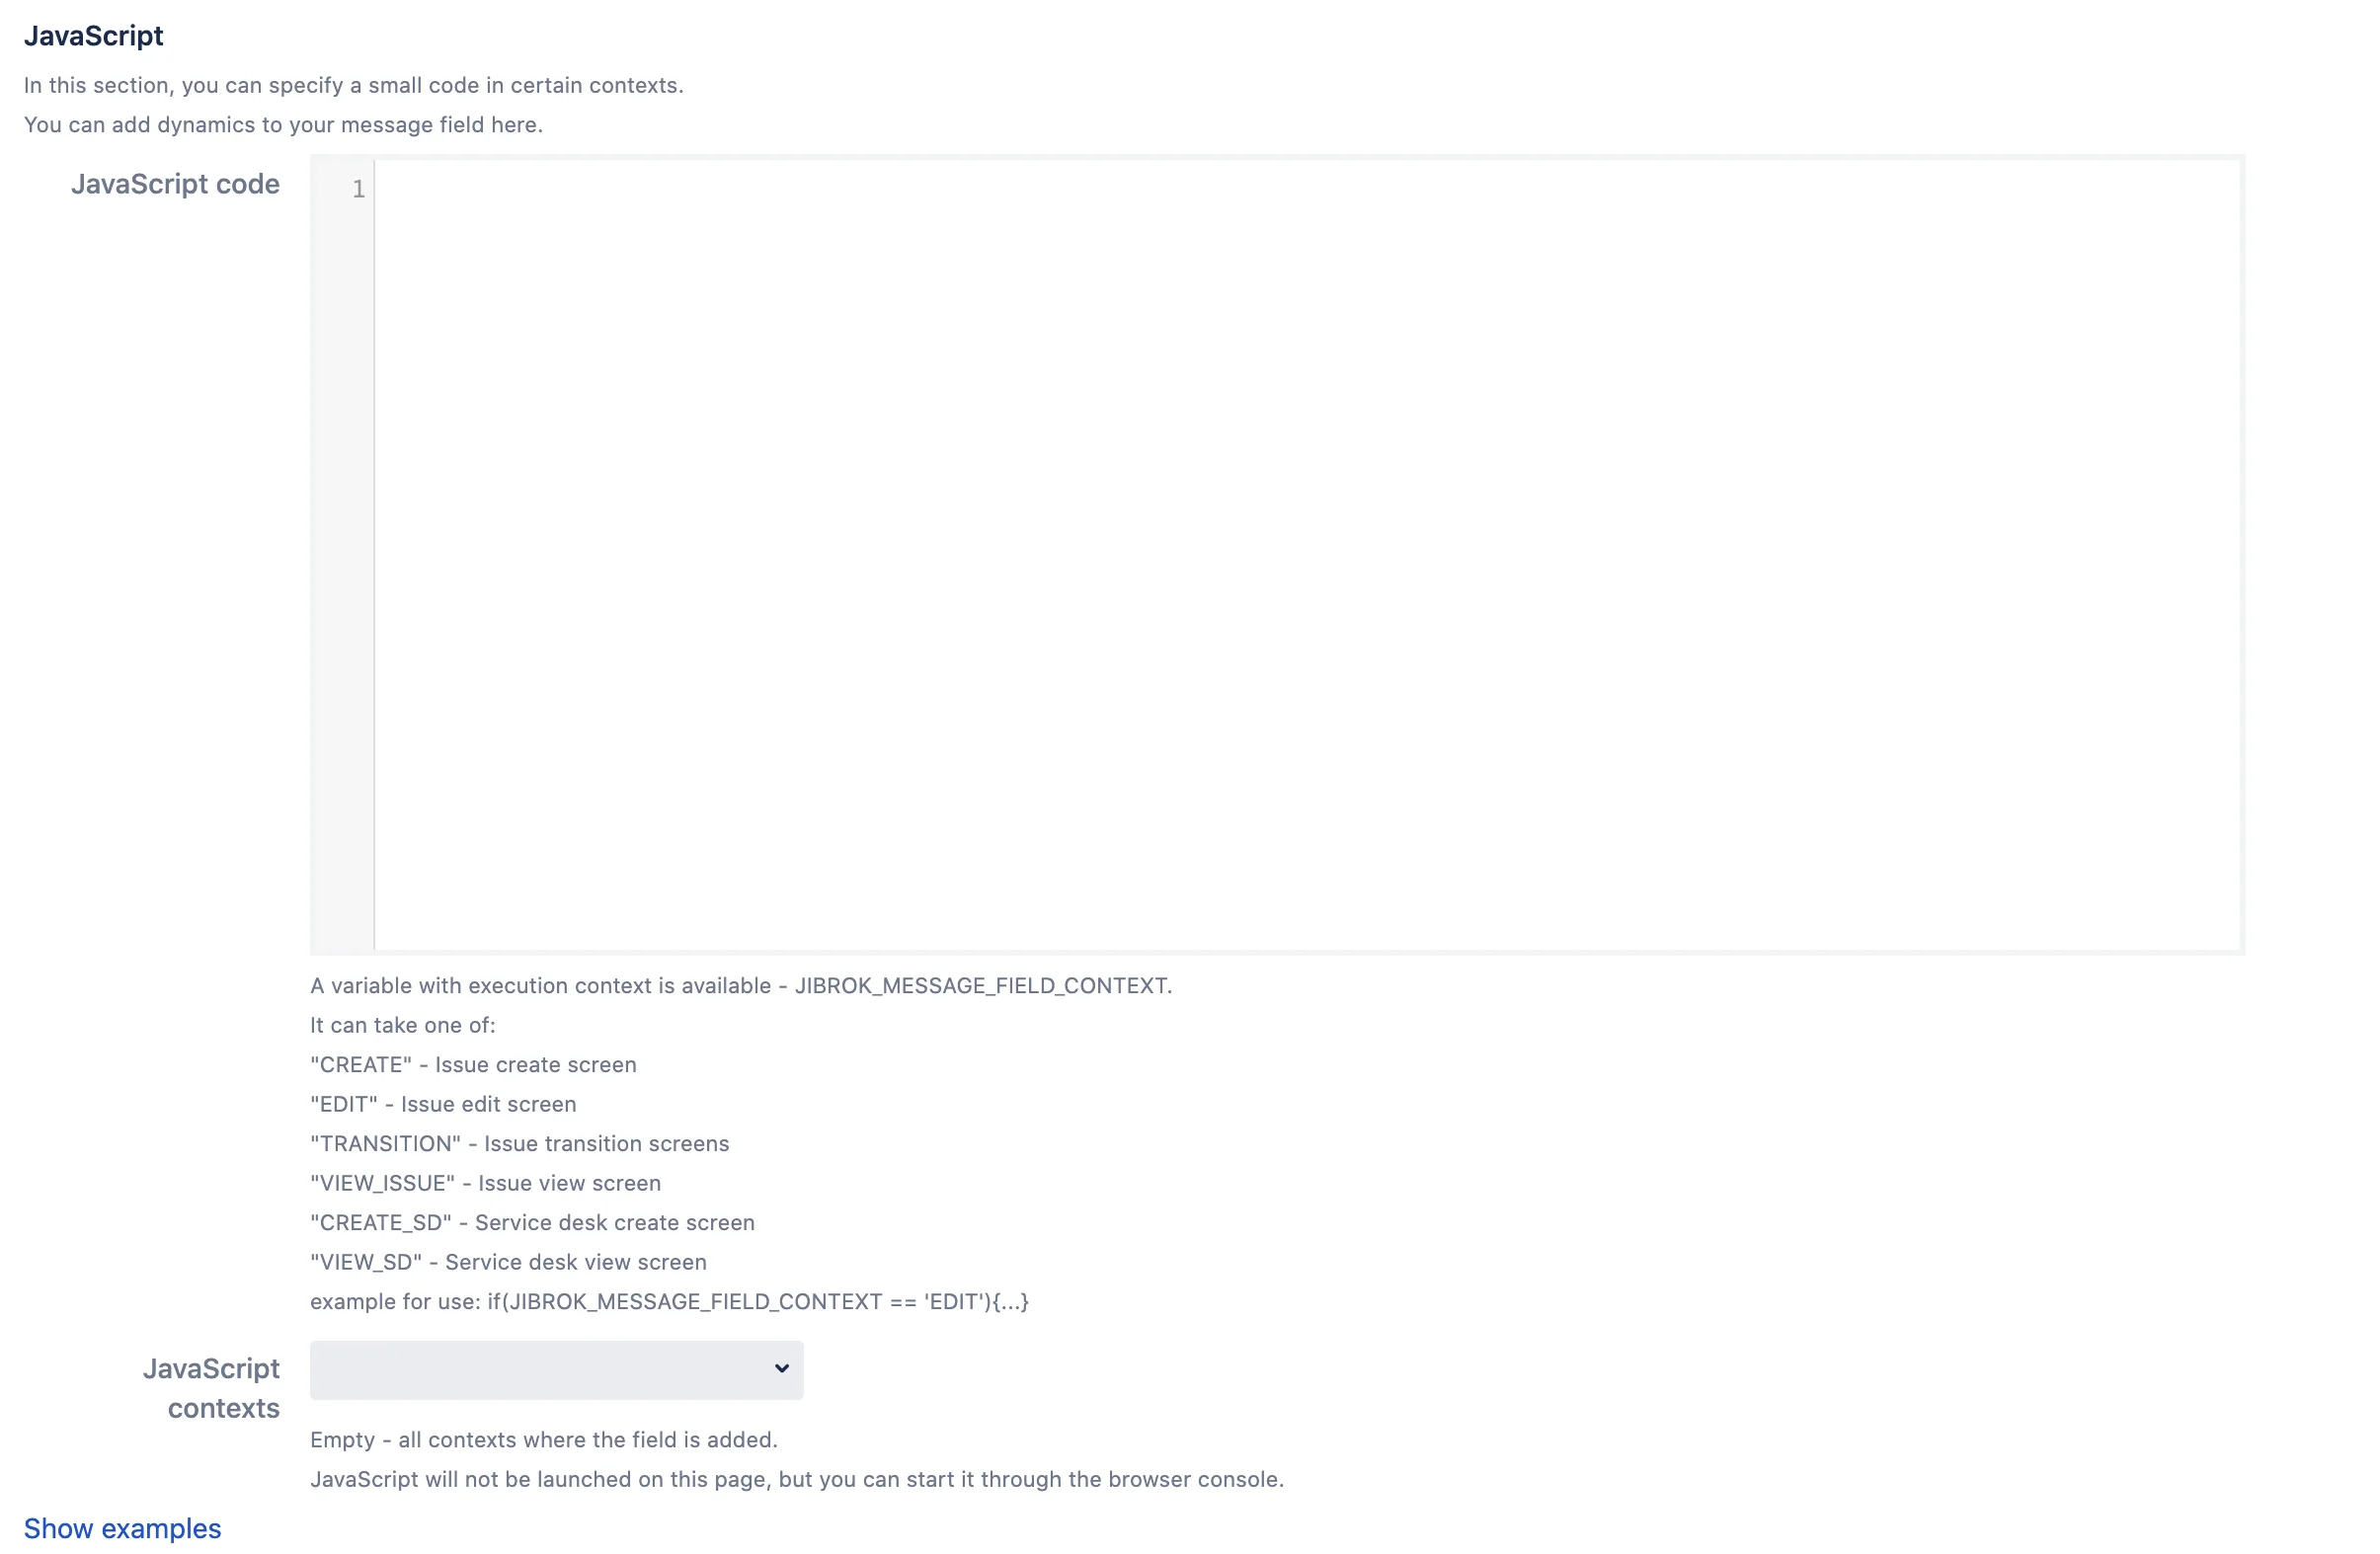
Available Variables and Objects
-
JIBROK_MESSAGE_FIELD_CONTEXT - Contains the current screen context (CREATE, EDIT, TRANSITION, VIEW_ISSUE, CREATE_SD, VIEW_SD)
- form - Interact with form fields on create/edit/transition screens
form.getContext()- Get current form contextform.getFieldById("customfield_10000").val()- Get field valueform.getFieldById("customfield_10000").val("new value")- Set field valueform.getFieldById("customfield_10000").hide()- Hide fieldform.getFieldById("customfield_10000").show()- Show field- Methods can be chained:
.hide().val("text").show()
- messageField - Dynamically update the message
messageField.val("Simple text message")- Set plain textmessageField.val("<b>HTML</b> message")- Set HTML contentmessageField.val({title: "Title", body: "Body", type: "warning"})- Set message objectmessageField.val({title: "Title", body: "Body", type: "error", selectorEdit: "div.field-group:has(#priority)"})- Set message with custom location
JavaScript Example
let priorityReason = form.getFieldById("customfield_10404");
let highPriorityId = 2;

if(form.getFieldById("priority").val() == highPriorityId){
    highPriorityMessage();
    priorityReason.show();
} else {
    cleanMessage();
    priorityReason.hide();
}

function cleanMessage(){
    messageField.val(null);
}

function highPriorityMessage(){
    messageField.val({
        title: "High Priority Issue",
        body: "Please provide justification in the Priority Reason field",
        type: "warning",
        selectorEdit: "div.field-group:has(#priority)"
    });
}
JavaScript Settings
- JavaScript code - Your custom JavaScript code
- JavaScript contexts - Select screens where the code should execute
- Leave empty to run on all screens
- Options: Issue Create, Issue Edit, Transition, Issue View, Service Desk Create, Service Desk View
- Run this code only once on page load, or on every update of issue data
- No (default) - Code runs once when the page loads
- Yes - Code runs every time issue data is updated (useful for real-time field interactions)
- Note: Due to Jira’s loading order, some elements may not be available immediately. Consider using delays or the “Yes” option for apps that load content dynamically.
Delegation (Admin only)
Allow non-admin users to manage message field configurations for specific projects.
Important Security Considerations
- Delegated users can access sensitive Jira data through Velocity templates
- They can read issue data, project information, and user details as if they have admin rights
- Only delegate to trusted users who understand the security implications
Delegation Settings
- Delegate configuration of this message to project leads
- Enable to allow specified users to edit this message configuration
- These users can modify all settings including Velocity templates
- Project Roles that are allowed to manage configuration
- Select project roles that can edit the message
- Users need the role in the specific project context
- Groups that are allowed to manage configuration
- Select user groups that can edit the message
- Applies globally across all projects
- Users that are allowed to manage configuration
- Select specific users who can edit the message
- Useful for individual delegation
How Delegation Works
- Delegated users can edit message settings through the project settings page
- They have access to the same configuration options as administrators
- Multiple projects can delegate to the same message field configuration
- The user needs to match at least one condition (role, group, or specific user) to edit
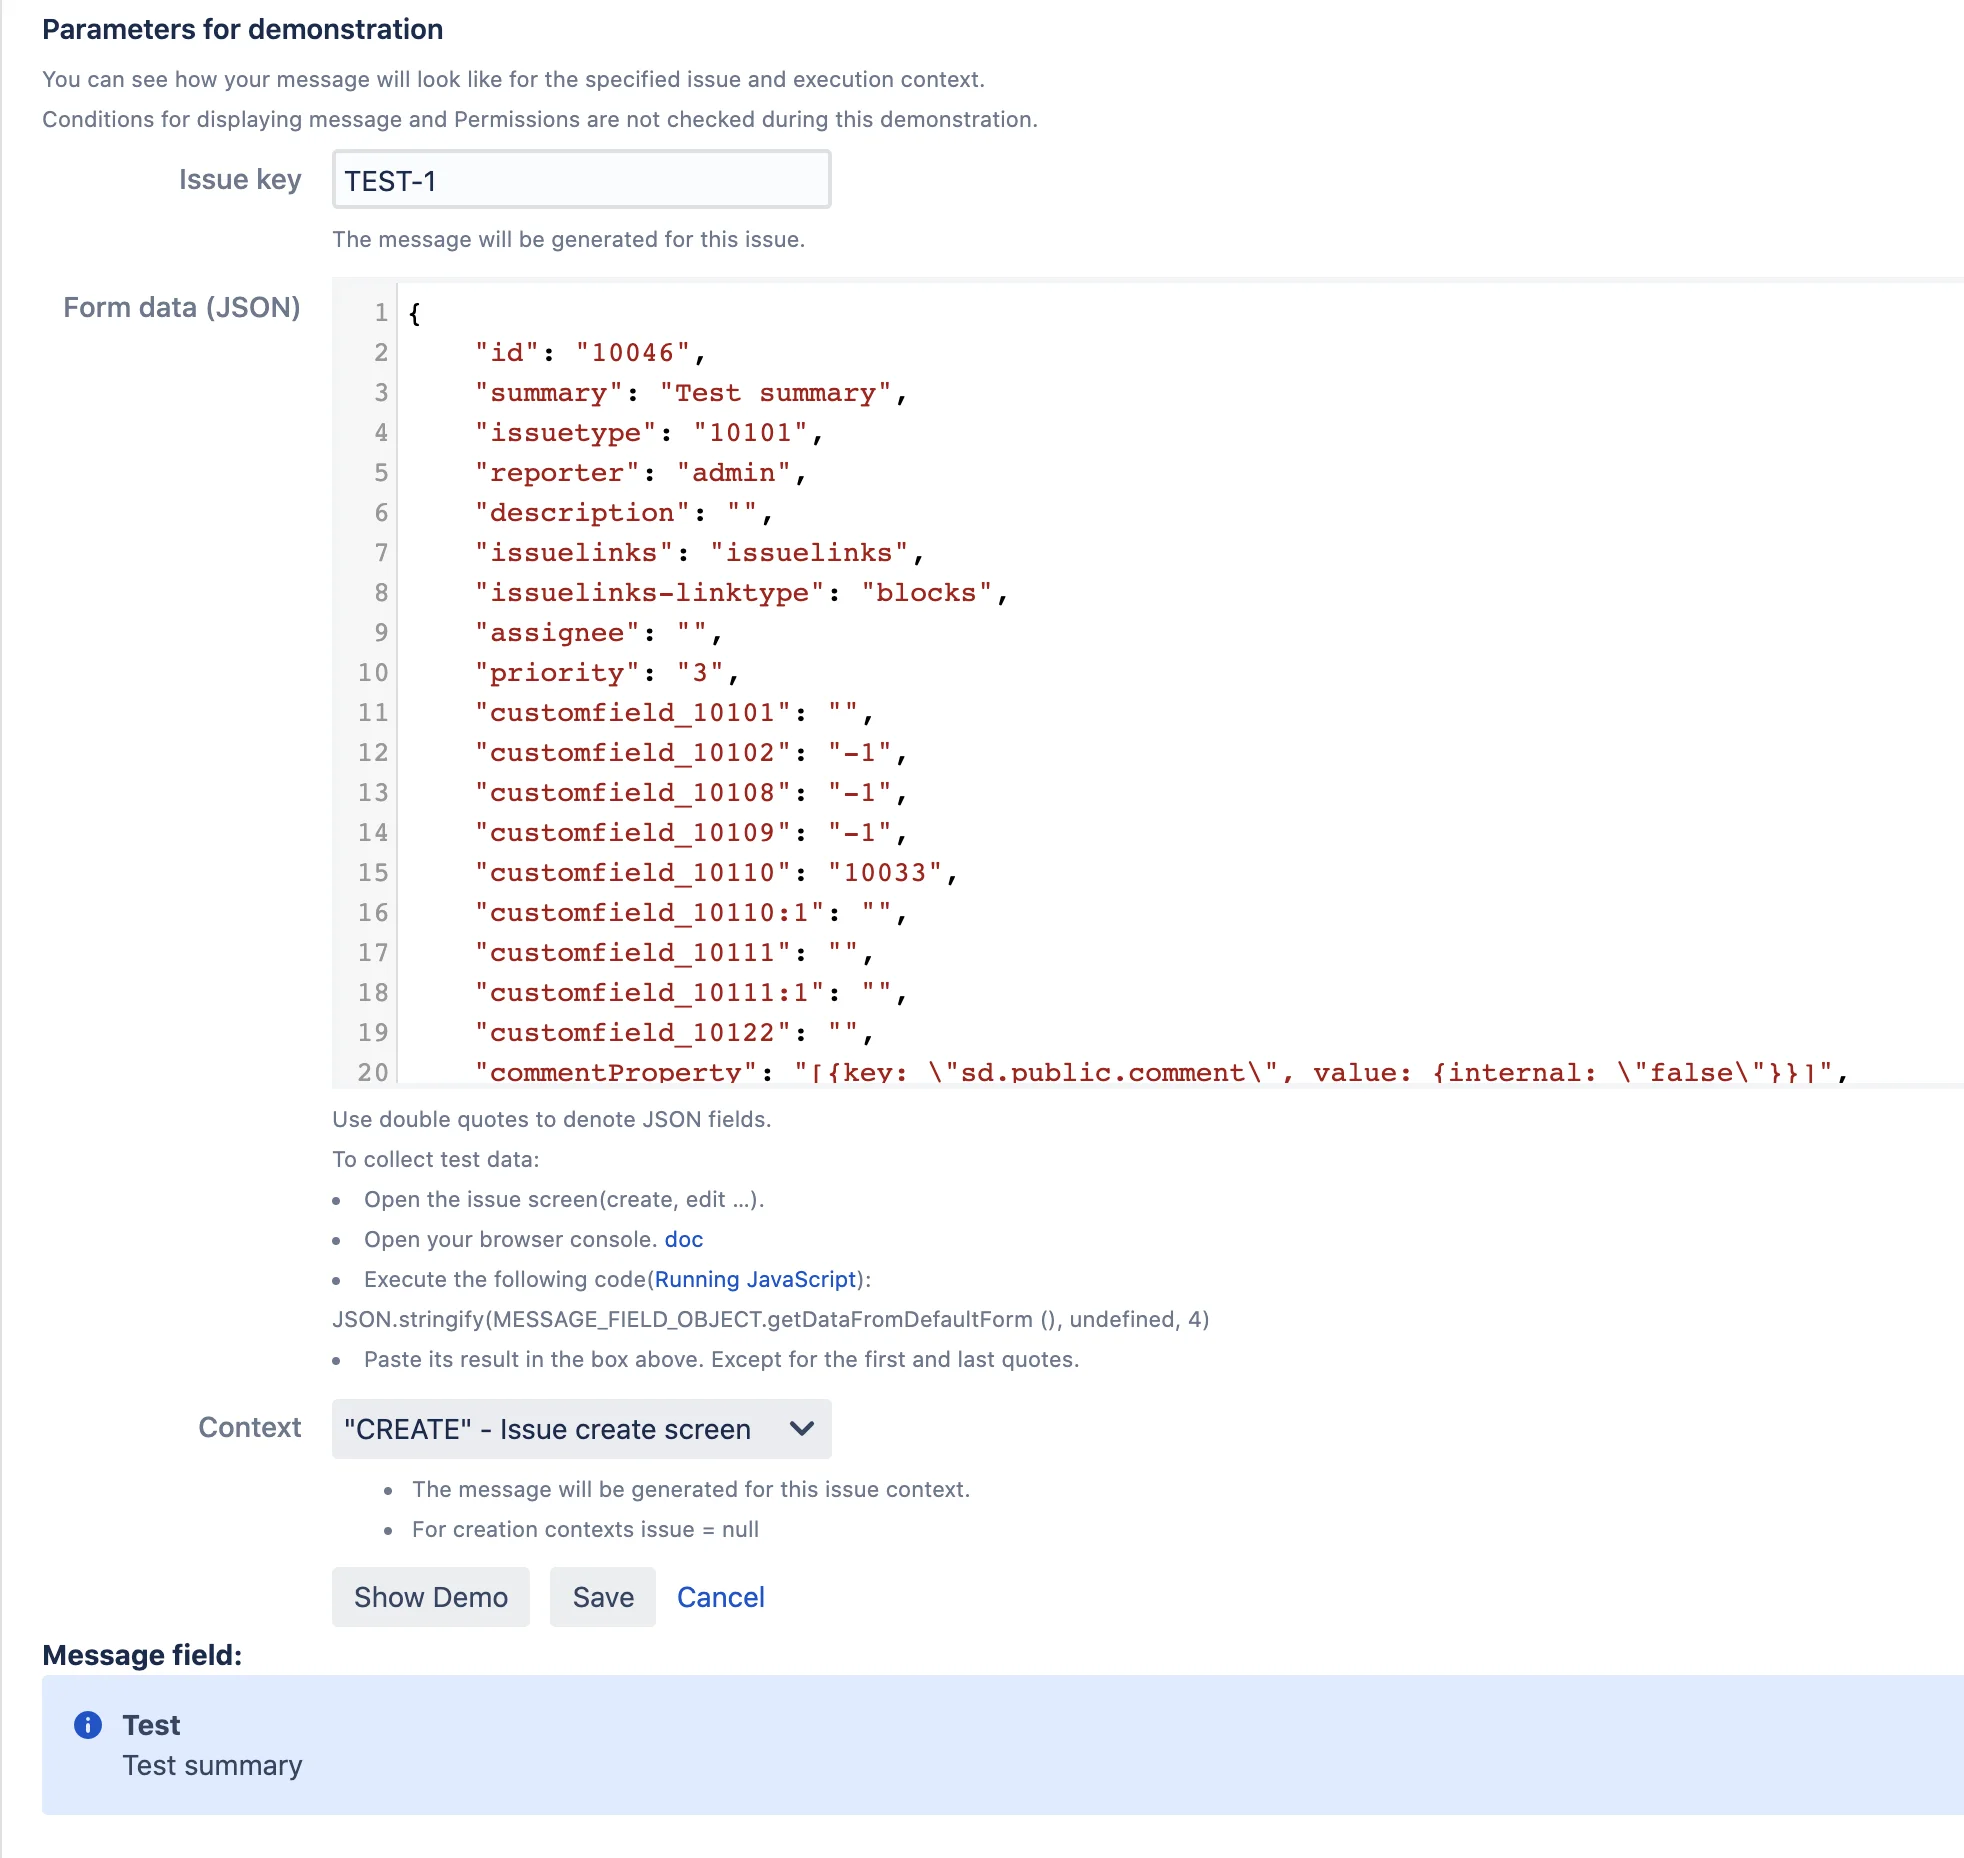
Testing and Preview
Demo Parameters
Test how your message will appear before saving:
- Show Demo - Preview the message with current settings
- Clean preview - Clear the preview area
When Velocity render is enabled, additional demo options appear:
- Issue key - Test the message with data from a specific issue
- Form data (JSON) - Simulate form data for testing dynamic content
- Use double quotes for JSON
- To get real form data: Open the browser console and run
MESSAGE_FIELD_OBJECT.getDataFromDefaultForm()
- Demo Context - Test how the message appears on different screens
- Issue Create, Issue Edit, Transition, Issue View, Service Desk Create, Service Desk View
- Transition ID/Name - When testing transition context, specify the transition details
Note: Demo mode shows the message appearance but doesn’t validate conditions or permissions.
Testing Conditions
Use the test buttons in each tab to validate your configurations:
- Validate JQL - Check if your JQL query is valid and see how many issues match
- Test Conditions - Check if conditions would show/hide the message for a specific issue
- Check Permissions - Verify if a specific user would see the message based on group/role settings
Click Save after configuring all settings.


