 Time in status | SLA | Timer | Stopwatch
- Overview
- Before you start
- Migration flow at a glance
- Unsupported field types
- Step 1 · Import plugin settings
- Step 2 · Create plugin fields in Cloud
- Step 3 · Bind plugin configs to field contexts
- Verification checklist
- Troubleshooting
- Getting help
Overview
This guide walks you through moving Time in Status from Jira Data Center (or Server) to the Forge build of Time in Status for Jira Cloud. The migration happens in three steps and in a strict order:
- Plugin settings (work calendars, field configurations, TIS / Timer / Stopwatch / Panel schemes, custom events) are copied from Data Center to Cloud.
- Plugin custom fields are created in Cloud and attached to the same screens, projects and issue types.
- Plugin configs are bound to each field context so the Cloud fields display the same data the Data Center fields used to.
Each step has a manual and an automatic path. The automatic paths are faster, less error-prone, and remap status IDs between instances - prefer them unless you have a reason not to.
The Cloud side must run the latest Forge build of Time in Status from the Atlassian Marketplace. Older Cloud installations (Connect or pre-migration Forge builds) will not accept the imported settings, the JCMA payload, or the binding manifest produced by the migration script.
Before you migrate, review what changes on the Cloud side. Due to architectural differences between Data Center and Forge, some features are implemented differently or not at all. See the Time in Status - DC / Connect / Forge feature comparison page for a feature-by-feature breakdown - it is the best way to understand what your admins and users will see after the migration.
Companion guide on the Cloud side. This page covers the procedure from the Data Center side. The DC → Forge migration guide on the Cloud side describes what JCMA delivers to Cloud, the alternative manual JSON import workflow, the JQL syntax mapping, and the consolidated post-migration checklist.
Before you start
- Latest Data Center app version. The in-app Migration page described below only exists in recent Time in Status DC builds. Upgrade the DC app first so the Migration menu item appears.
- Latest Forge build of Time in Status Cloud. Install the Cloud app from the Atlassian Marketplace on the destination site before starting the migration.
- Jira admin on both sites. You need administrator permissions on the Data Center and the Cloud destination.
- JCMA destination configured. The Jira Cloud Migration Assistant must already be configured with the target Cloud site - this is an Atlassian prerequisite that applies to any DC → Cloud app migration.
- JiBrok Studio for Jira Cloud installed on the destination. Step 2 runs a generated scenario inside JiBrok Studio. Install it on the Cloud site before you reach Step 2.
- Know which fields you have. Open Time in Status in Data Center and review the Field Settings tab. Every custom field listed there is a candidate for migration.

Field Settings in Data Center - the source of truth for what the migration needs to recreate in Cloud.
Migration flow at a glance
| Step | Manual path | Automatic path (recommended) |
|---|---|---|
| 1. Plugin settings | Export JSON from the DC Migration page → Import in TIS Cloud → Import / Export | Run JCMA with the Time in Status app enabled |
| 2. Custom fields | Recreate each field in Jira Cloud manually and attach it to screens / contexts | Run the generated JiBrok Studio scenario from the DC Migration page |
| 3. Config bindings | Open each context in Jira Cloud → Edit custom field config → pick the matching TIS field setting | Copy the BINDING MANIFEST from the scenario log → paste into Apply binding manifest in TIS Cloud |
The remainder of this guide covers the three steps in detail. Screenshots follow the recommended path end to end.
Unsupported field types
A few DC field types rely on calculated-field hooks that do not exist on Forge and therefore cannot be created by the migration:
- TIS Helper - Statistic (
jibrok-time-in-status-helper-field) - TIS Helper - Number (
jibrok-time-in-status-helper-number-field) - Timer Helper - Statistic (
jibrok-time-in-status-helper-statistic) - Timer Helper - Date (
jibrok-timer-helper-date-field) - Timer Helper - Number (
jibrok-timer-helper-number-field) - Stopwatch Helper - Statistic (
jibrok-stopwatch-helper-field) - Stopwatch Helper - Date (
jibrok-stopwatch-helper-date-field) - Stopwatch Helper - Number (
jibrok-stopwatch-helper-number-field)
The DC Migration page flags any fields of these types in its Migration warnings box and marks them as No Cloud equivalent in the Fields in this instance table. For each such field, decide whether to drop it or to rebuild the equivalent value on the Cloud side with JBCF Calculated Fields or a JiBrok Studio scheduled scenario. Base Time in Status, Timer, Stopwatch and Calendar Select fields are all fully supported.
Step 1 · Import plugin settings
Path A · JCMA (recommended)
The Jira Cloud Migration Assistant carries the Time in Status settings as part of a normal app migration and automatically remaps status IDs between Data Center and Cloud. Identical statuses have different IDs on each side - JCMA rewrites those IDs inside the plugin payload so calendars and field settings arrive in Cloud already referencing valid Cloud statuses.
- In Data Center open Jira Administration → System → Migration (or navigate to
/secure/migration-app-action.jspa). - Create or open a migration, select Apps, and make sure Time in status / SLA / Timer / Stopwatch for Jira DC/Cloud is marked as Needed in cloud.
- Run the migration and wait for the app migration progress row to reach 100%.
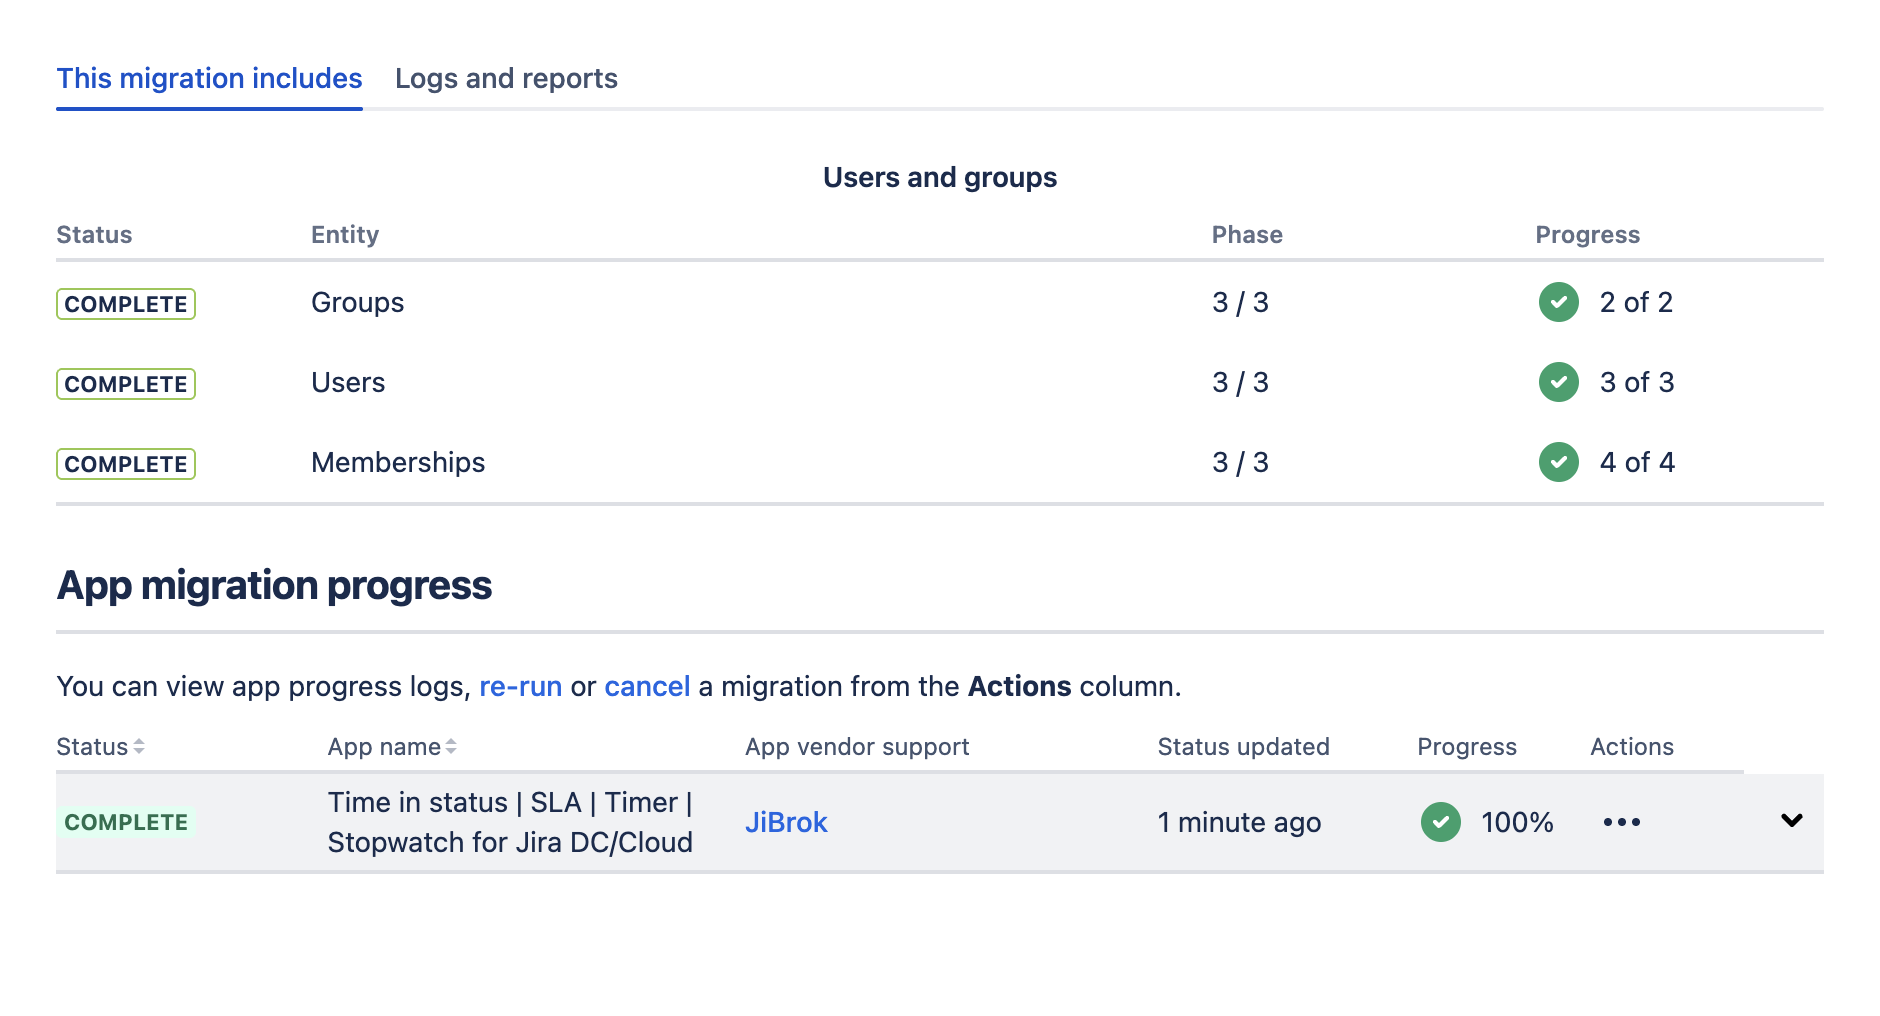
JCMA reports the Time in Status app migration as complete.
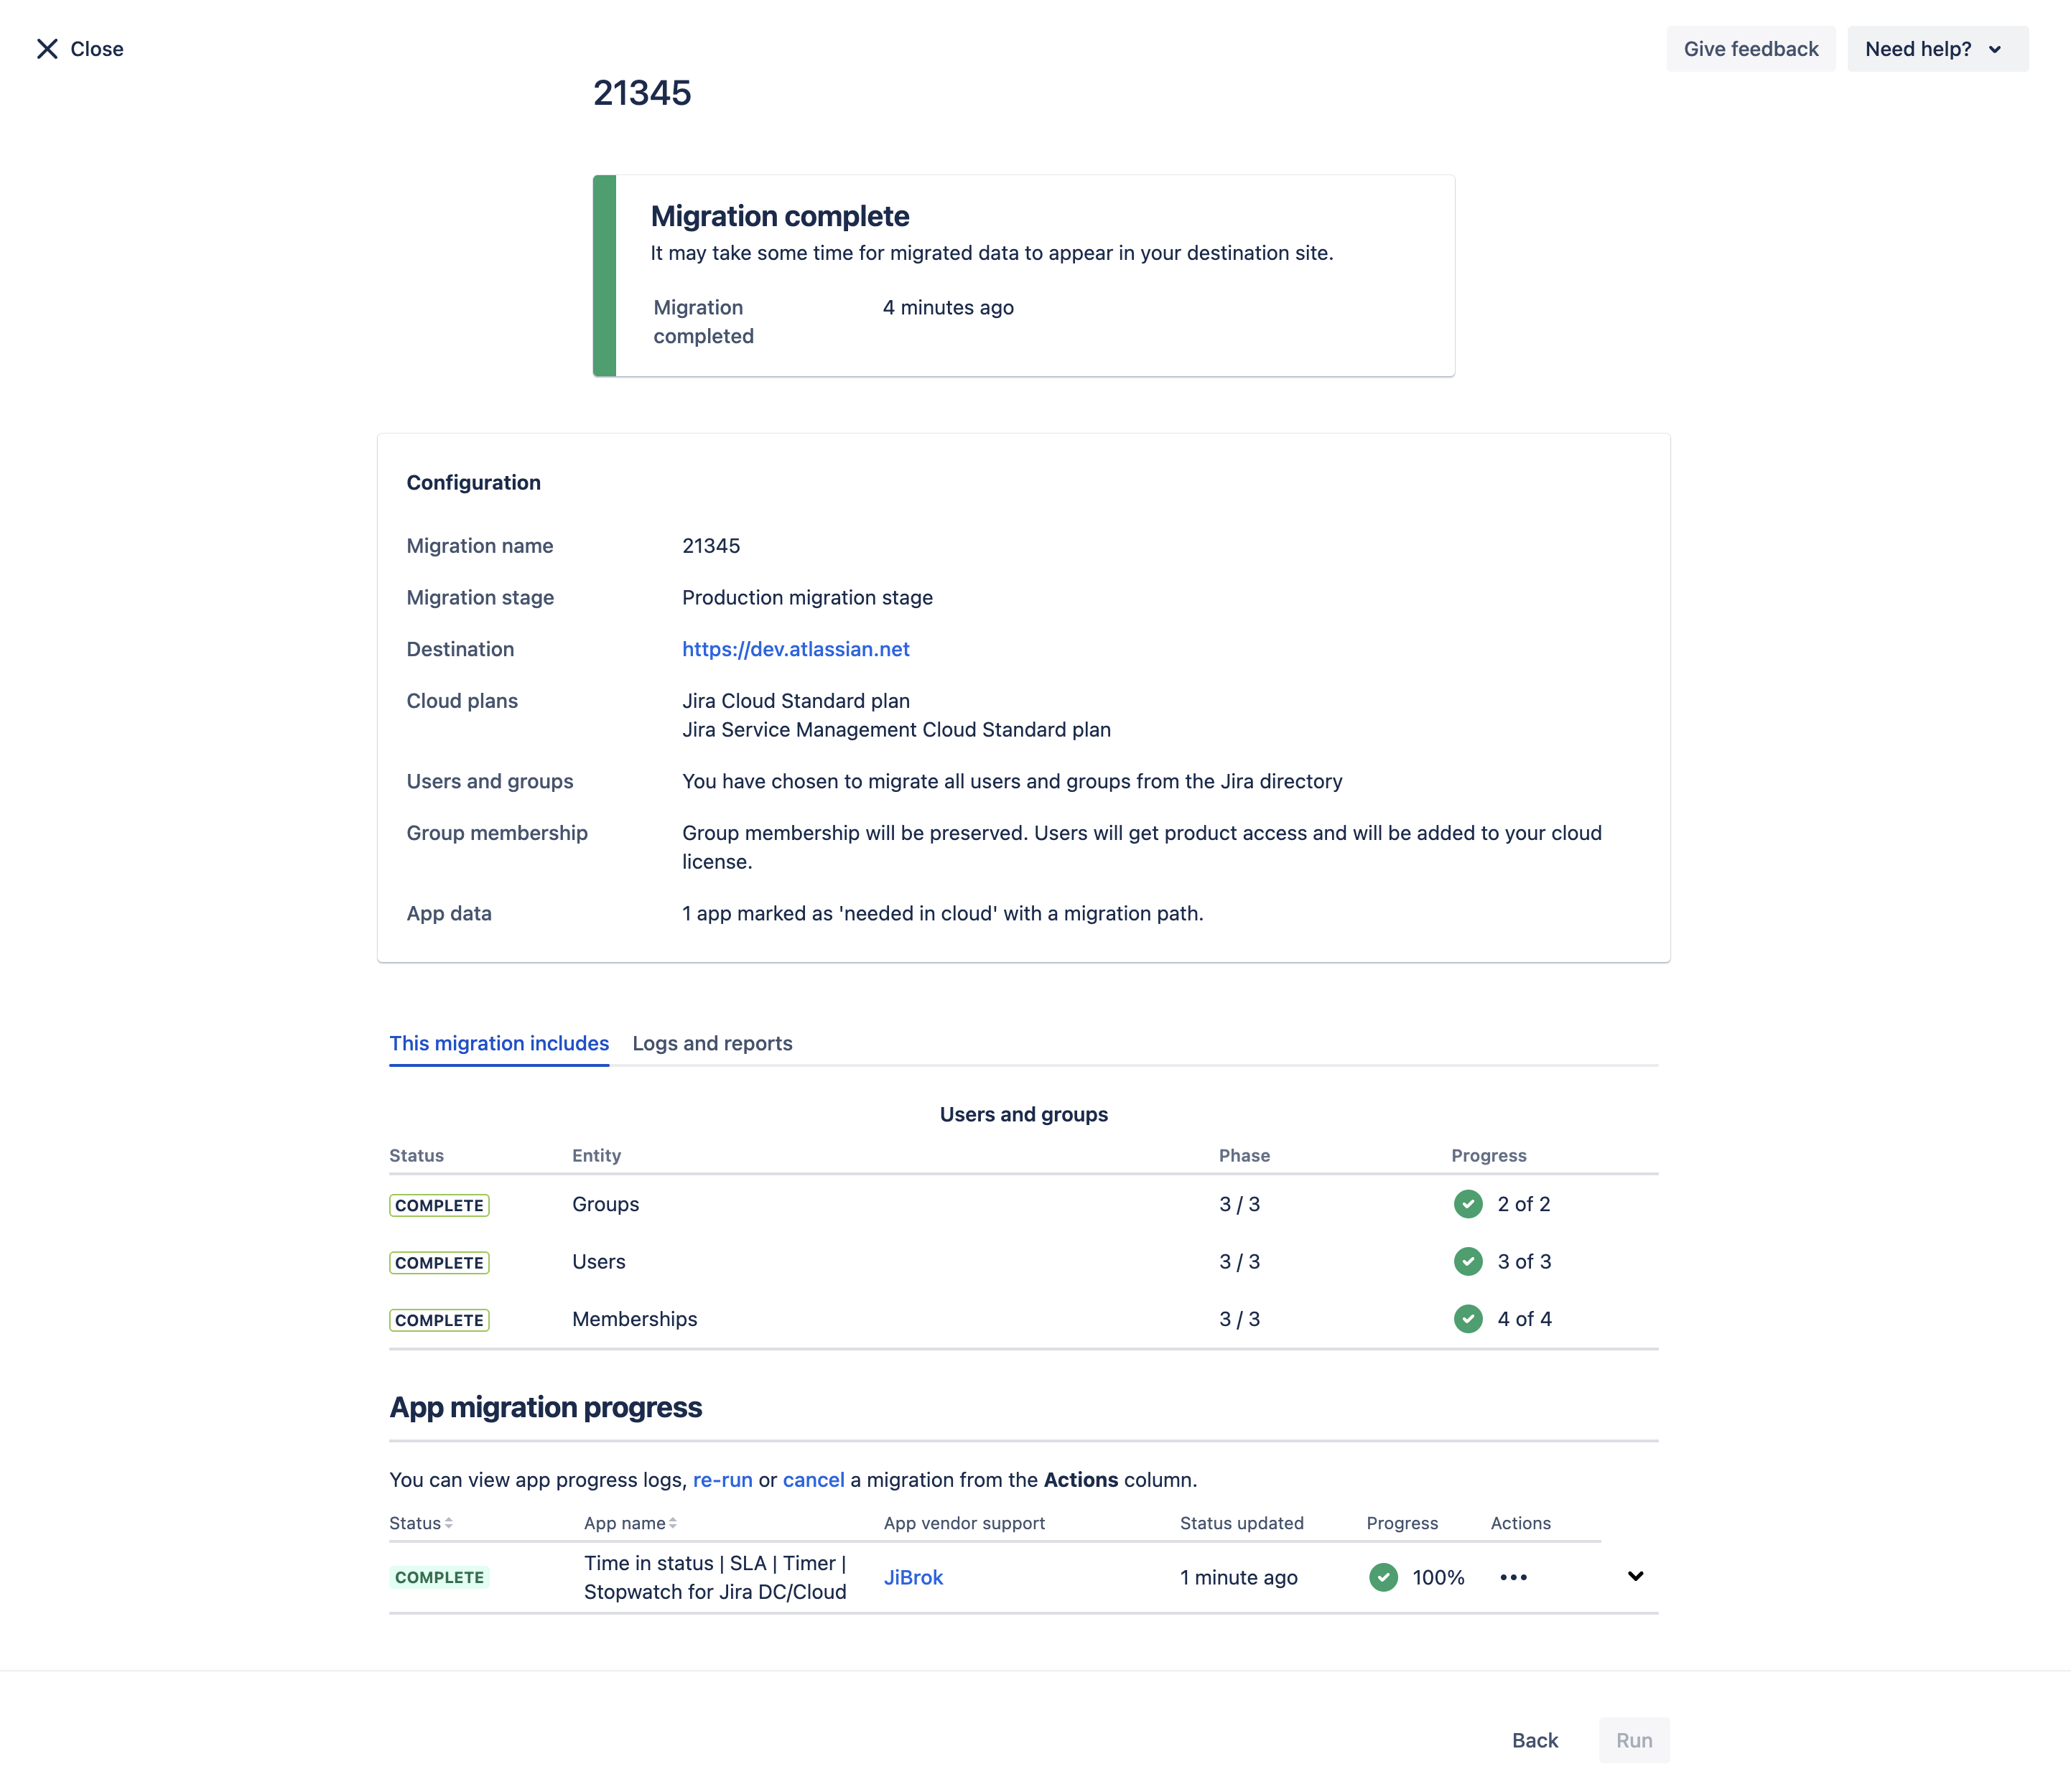
Migration complete summary - a successful run shows every phase as COMPLETE.
At this point your work calendars, TIS / Timer / Stopwatch configurations, panel configurations, custom events and field bindings exist in Cloud. The custom fields themselves are not created yet - that is Step 2.
For a Cloud-side breakdown of exactly what JCMA carries automatically and what still needs manual work after this step, see Automatic path via JCMA on the Cloud-side guide.
Path B · Manual JSON export / import
Use this path only when JCMA is not an option and you are confident that status IDs already match between DC and Cloud (or you have set them up manually to match). Status IDs are not remapped in this path.
- In Data Center open Administration → Add-ons → Time in Status → Migration. This is the page that also generates the Step 2 script.
- Click Export Configuration (JSON). In the dialog, choose the categories to include (work calendars, custom events, TIS / panel / stopwatch / timer configurations, field bindings) and click Download File.
- Open Jira Cloud → Apps → Time in Status → Import / Export, click Import Settings, and upload the file.
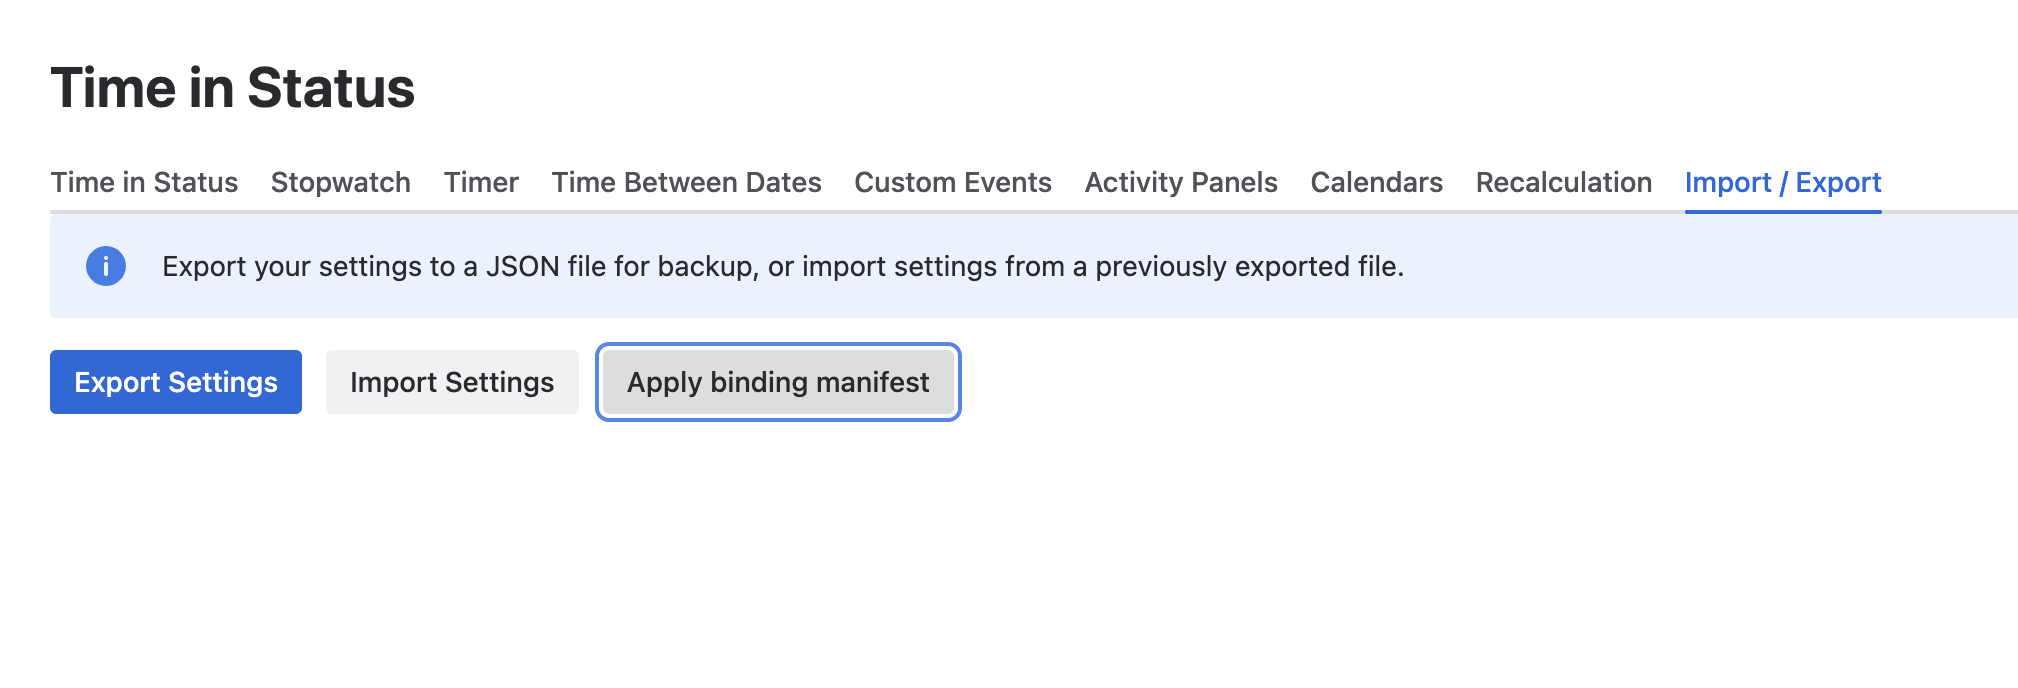
Import / Export tab in Time in Status Cloud - the manual JSON import and the binding manifest both live here.
For the full Cloud-side manual workflow (import → review conversion warnings → create fields → bind → configure panels → recalculate), see Manual path (JSON export / import) on the Cloud-side guide.
Step 2 · Create plugin fields in Cloud
Neither JCMA nor the JSON import materializes Jira custom fields on the Cloud side - the Atlassian platform does not let an app create its own custom fields from a settings payload. You create them with a JiBrok Studio scenario that the DC Migration page generates for your exact field list.
Find your TIS App ID and Environment ID
Open the Time in Status Cloud app in your Cloud site. At the bottom-left of any settings page the app prints its App ID and Environment ID (two UUIDs). Copy both - they go into the script generator along with the Cloud base URL (https://your-site.atlassian.net).
Generate the migration script
In Data Center, open the Migration page and scroll to Step 2 · Field creation script (JiBrok Studio). Fill in:
- TIS App ID - the UUID you copied from the Cloud TIS app.
- Environment ID - the second UUID shown next to App ID.
- Cloud Base URL - the destination site URL. Used only to build direct context links in the script log.
- Fields per script - how many fields each generated script handles. Leave at 20 for small instances; lower it for very large ones to split the work into shorter runs.
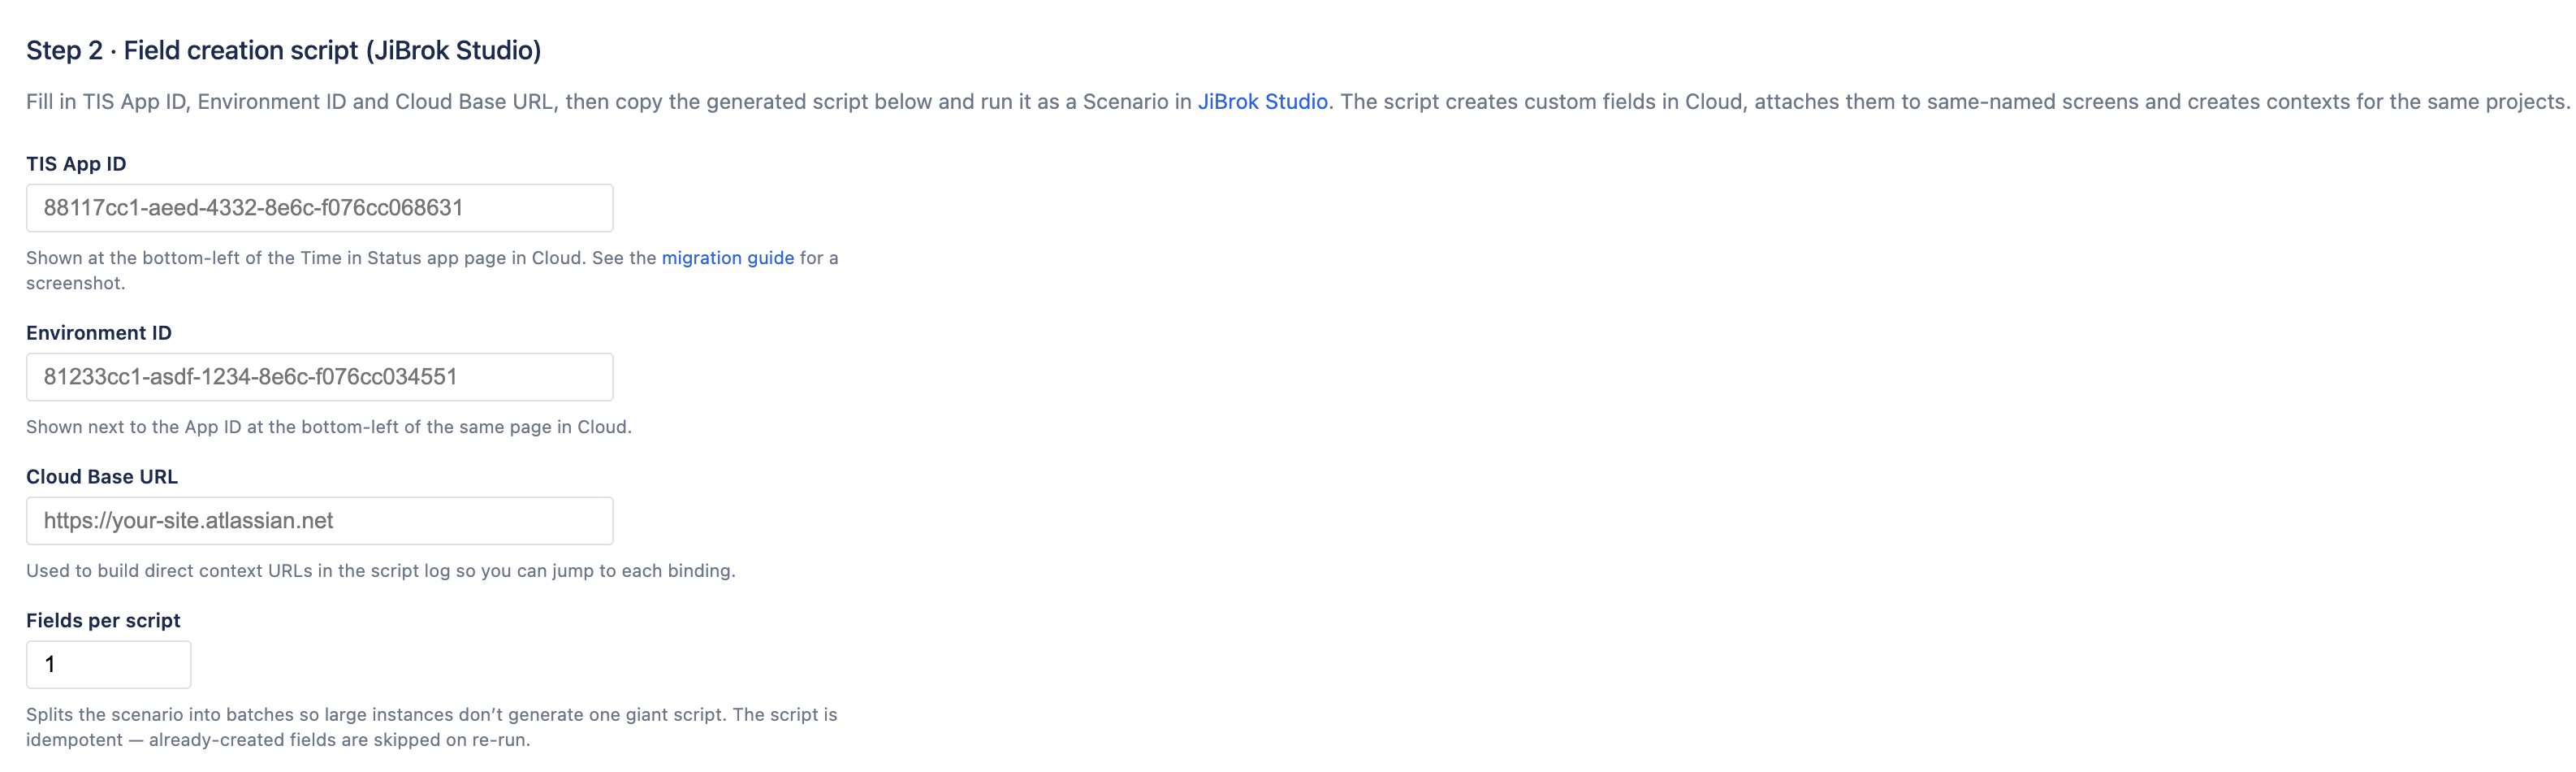
Step 2 inputs on the DC Migration page. The script is regenerated as you type.
The script is idempotent: already-created fields, contexts, and screen assignments are skipped on re-runs, so it is safe to interrupt and retry. If the DC Migration page splits your instance into multiple pages (e.g. Script 1 of 3), you will run each part in JiBrok Studio sequentially.
Use the Copy button above the script block, or Download to save a .js file.
Paste the script into JiBrok Studio
In Jira Cloud, open Apps → JiBrok Studio → Script Console, switch to the Library tab, and create a new script. Paste the generated scenario and give it a descriptive name, for example tis migration from DC - part 1.
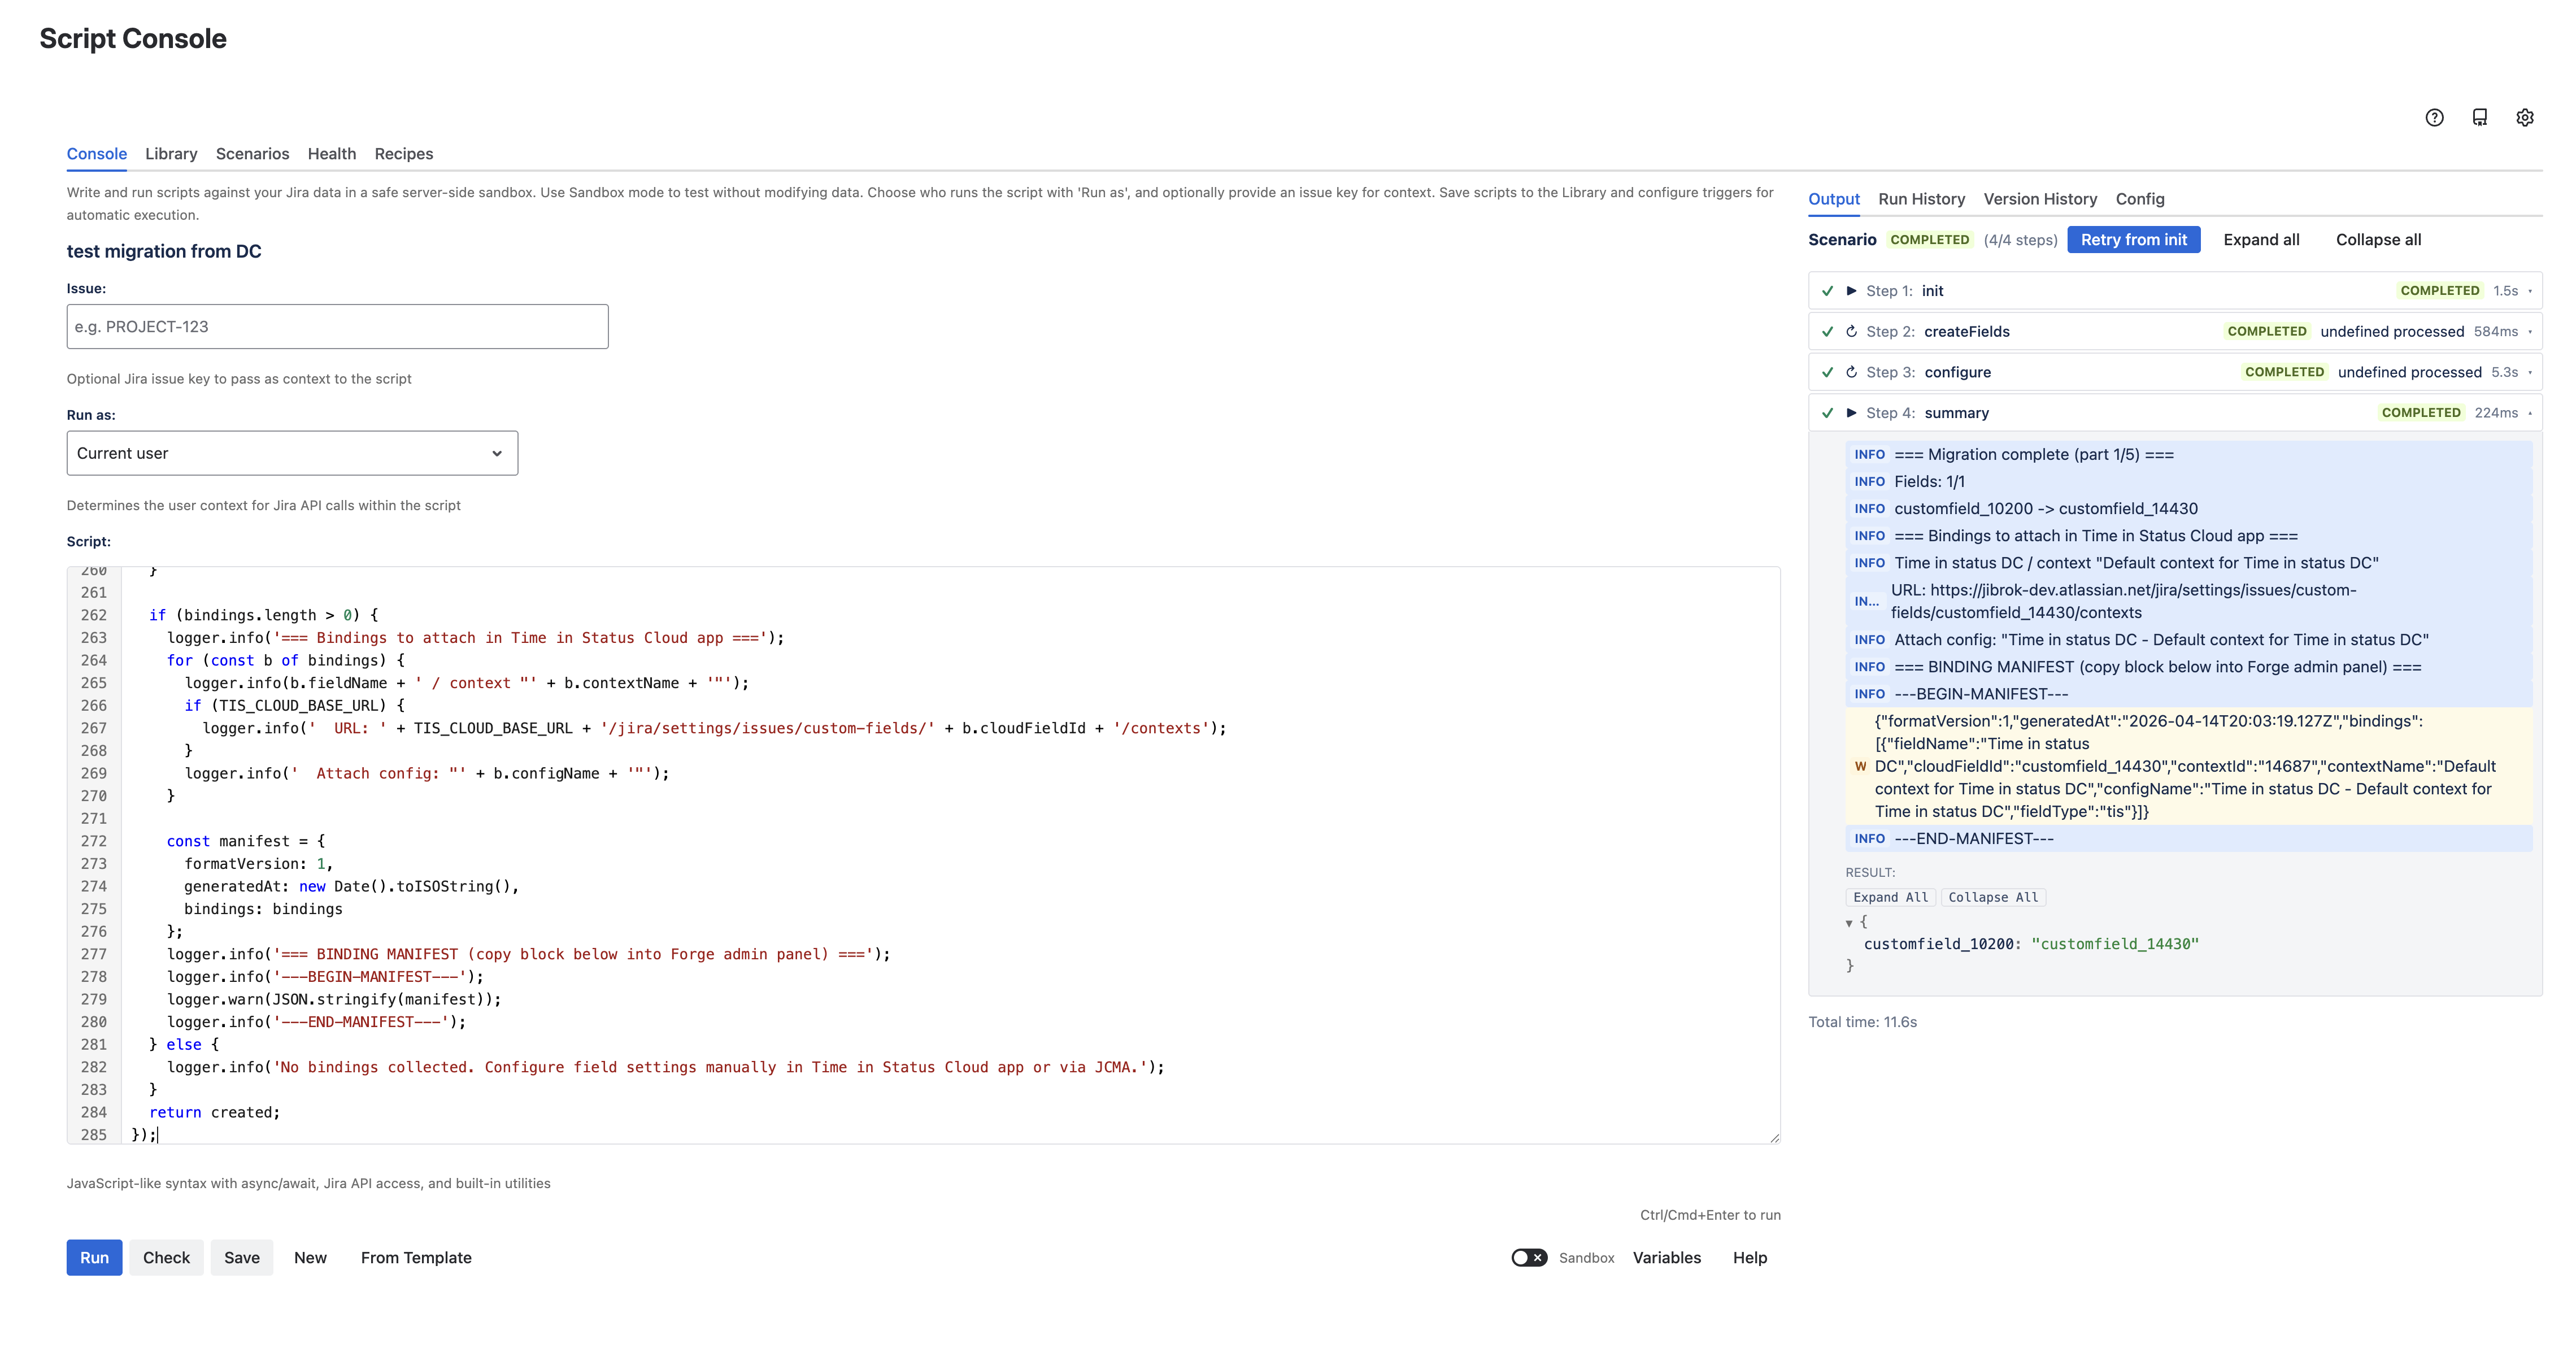
Migration script pasted into the JiBrok Studio Script Console. The right-hand panel already lists the four scenario steps.
Open the Config tab and make sure the script is Enabled, the engine is JavaScript, and the name/description are set.
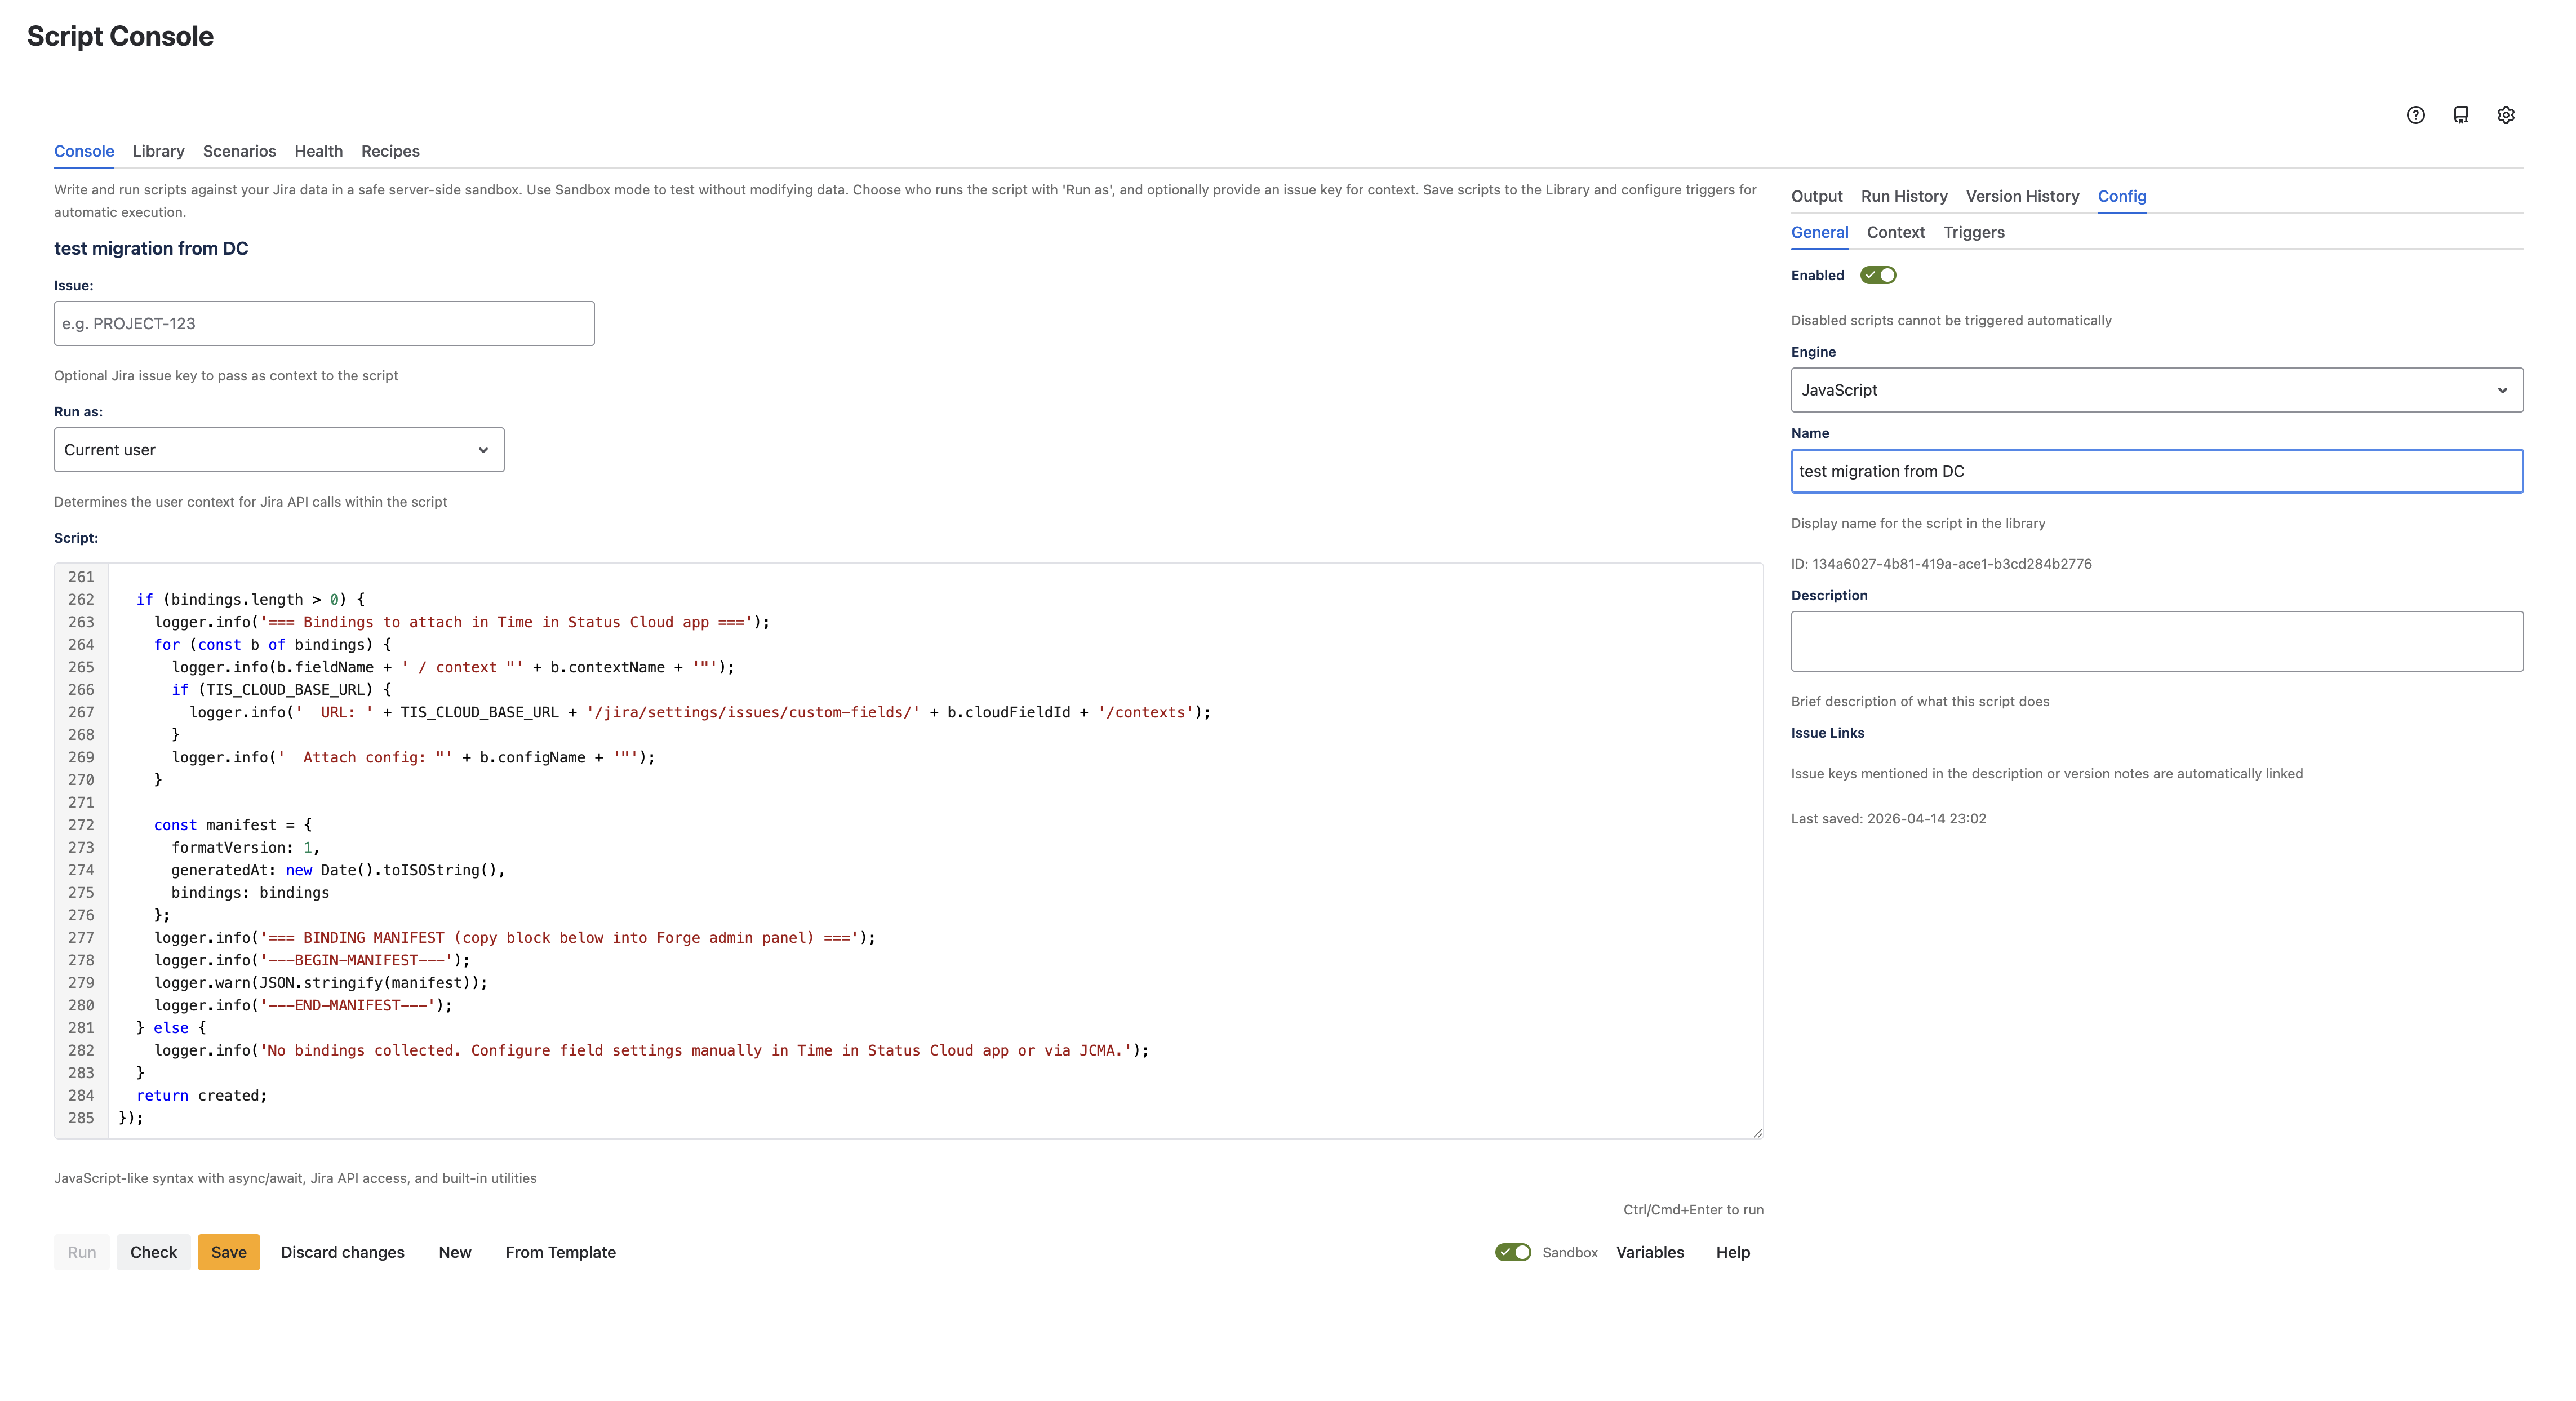
Config tab - keep the script enabled and on the JavaScript engine.
Save the script. Studio asks for an optional version note on each save, which makes it easy to roll back to a previous revision.

Save version - leave the note blank or describe the batch you are about to run.
Dry-run in Sandbox mode
Before running the scenario for real, enable Sandbox at the bottom of the Script Console. Sandbox mode simulates POST, PUT, and DELETE calls without touching Jira data, so you can confirm that every step reports green.
Click Run, then confirm the Run Scenario dialog. Each step in the output panel should finish as COMPLETED and the top of the page should show the yellow Sandbox mode - write operations were simulated, no changes were made to Jira banner.

A successful dry-run: every step completes and the Sandbox banner confirms no writes hit Jira.
Review the log for warnings - Skip <field>: unknown type flags unsupported fields (see the earlier section), and screen "<name>" not found points to screens that exist on DC but not on the Cloud site.
Run the scenario for real
Turn Sandbox off, click Run again, and confirm the Run Scenario dialog. The dialog lists the four scenario steps in order:
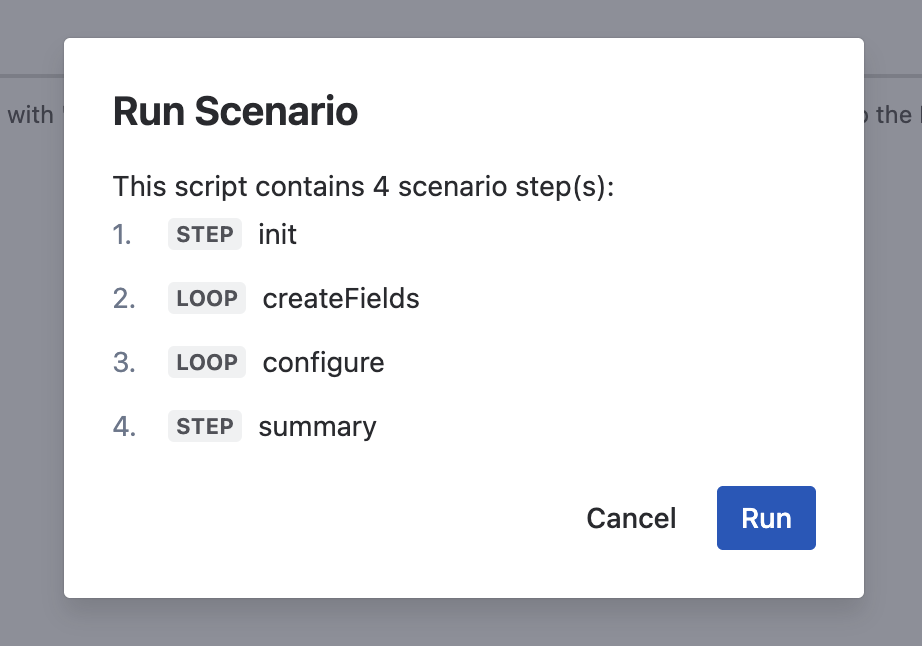
Run Scenario dialog - the four steps run in order every time.
Wait for the scenario to complete. A typical run on a small instance takes 10-15 seconds; large instances take proportionally longer.
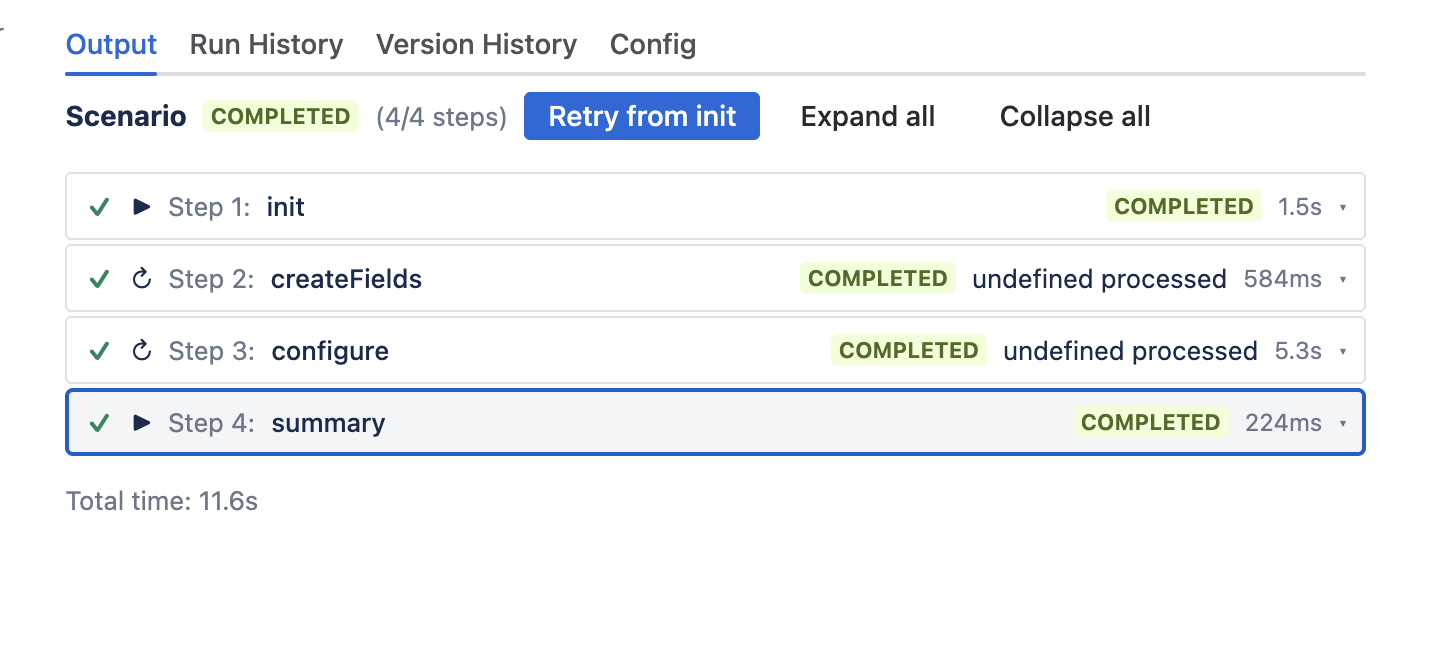
All four scenario steps completed - total time 11.6 seconds on this instance.
What each step does
- init - discovers Cloud-side state: issue types, projects, already-existing custom fields, screens. No writes.
- createFields - creates each custom field from the DC payload. If a field with the same name and Forge type already exists, it is reused and the ID is remembered for the next steps.
- configure - creates contexts on each new field (projects + issue types), adds the field to matching field configuration schemes, and attaches the field to same-named screens. Collects the list of config bindings that Step 3 will apply.
- summary - prints a per-field summary (
DC ID → Cloud ID) and emits the BINDING MANIFEST JSON block that Step 3 consumes.
Verify the fields appear in Jira Cloud
Open Jira administration → Work items → Custom fields and search for one of the migrated field names. Each field should show a Cloud customfield_* ID and the Time in Status field type.
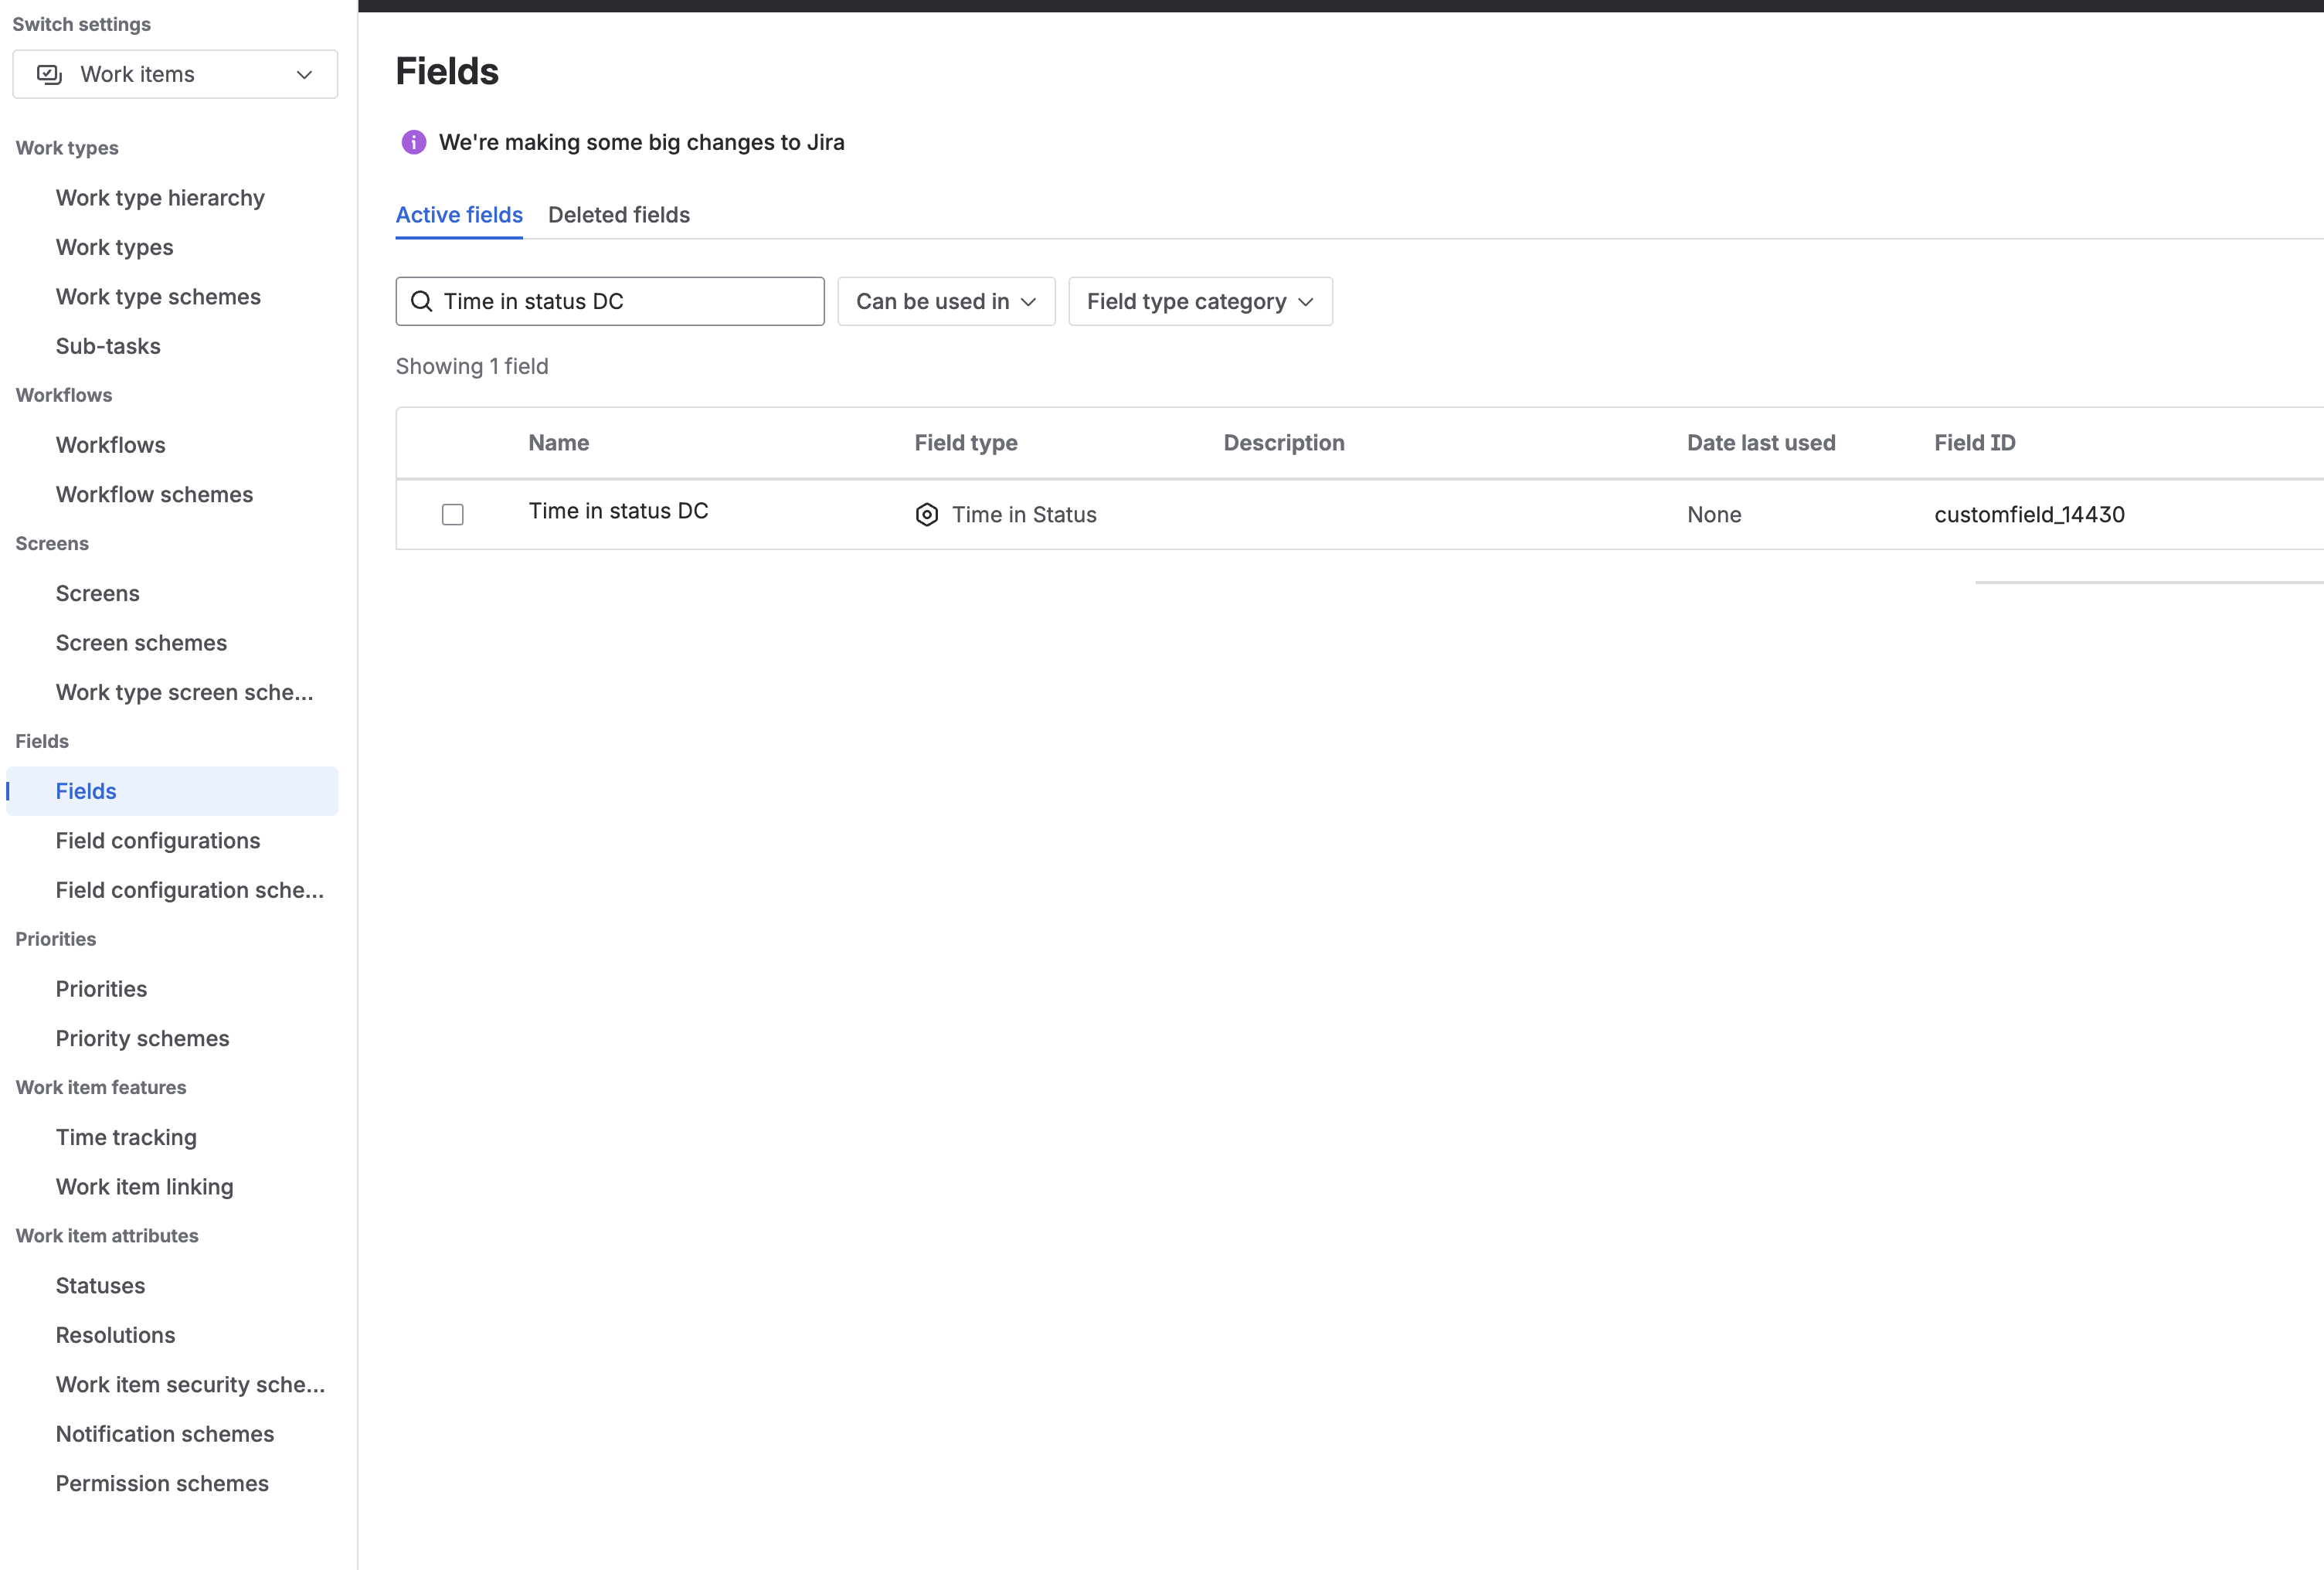
Jira Cloud custom fields page - the migrated Time in status DC field is now available.
Large instances and batching
If the DC Migration page shows more than one script (e.g. Script 1 of 3), paste and run each one in turn. The scenarios are idempotent, so you can re-run an earlier batch at any time without creating duplicates.
Step 3 · Bind plugin configs to field contexts
A binding maps a plugin configuration (the Time in Status / Timer / Stopwatch field setting that defines which statuses to track, which calendar to use, how to display values) to a specific (field, context) pair. Step 1 brought the configurations into Cloud. Step 2 created the fields and their contexts. Step 3 tells each context which configuration to display.
Path A · Binding manifest (recommended)
At the end of the Step 2 run, the summary step prints a BINDING MANIFEST block between two marker lines.
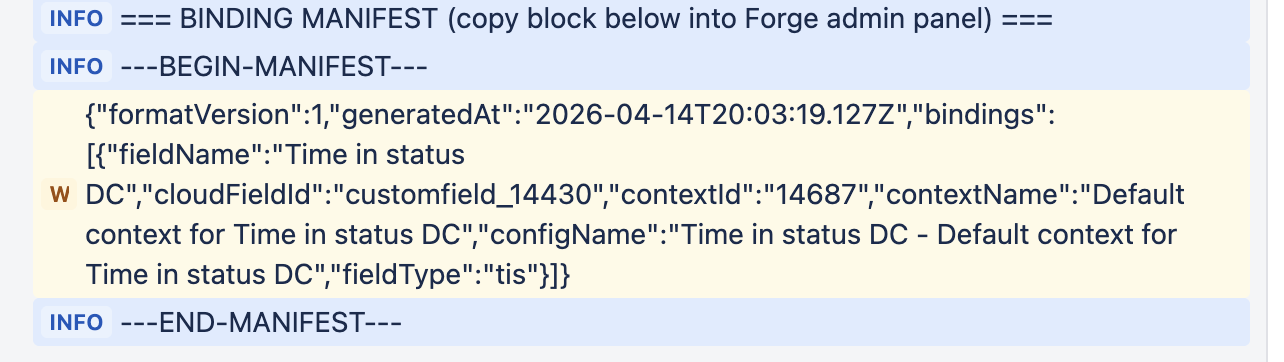
Locate the ---BEGIN-MANIFEST--- marker in the scenario log.
Select and copy the JSON object between ---BEGIN-MANIFEST--- and ---END-MANIFEST--- - only the JSON line itself, not the markers.
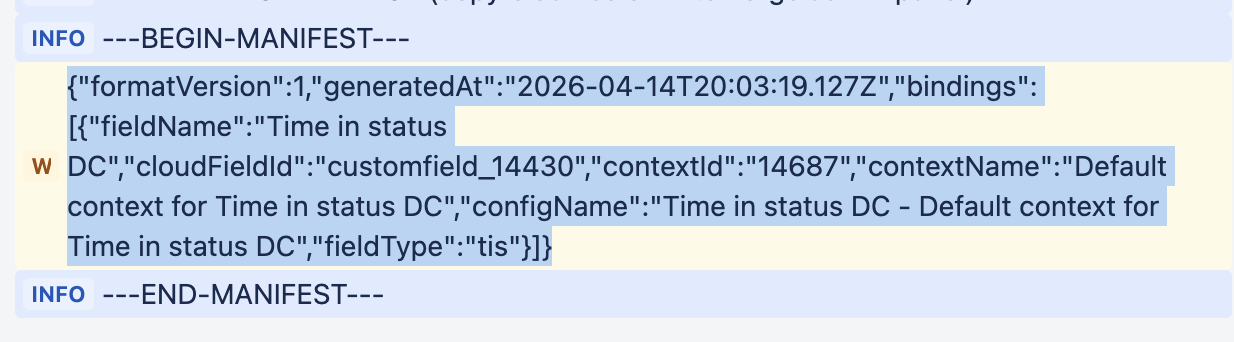
Copy the manifest JSON.
The manifest is a single JSON object with this shape:
{
  "formatVersion": 1,
  "generatedAt": "2026-04-14T20:03:19.127Z",
  "bindings": [
    {
      "fieldName": "Time in status DC",
      "cloudFieldId": "customfield_14430",
      "contextId": "14687",
      "contextName": "Default context for Time in status DC",
      "configName": "Time in status DC - Default context for Time in status DC",
      "fieldType": "tis"
    }
  ]
}
In Jira Cloud open Apps → Time in Status → Import / Export, click Apply binding manifest, paste the JSON into the textarea and click Apply. Time in Status attaches each plugin config to the matching context automatically.
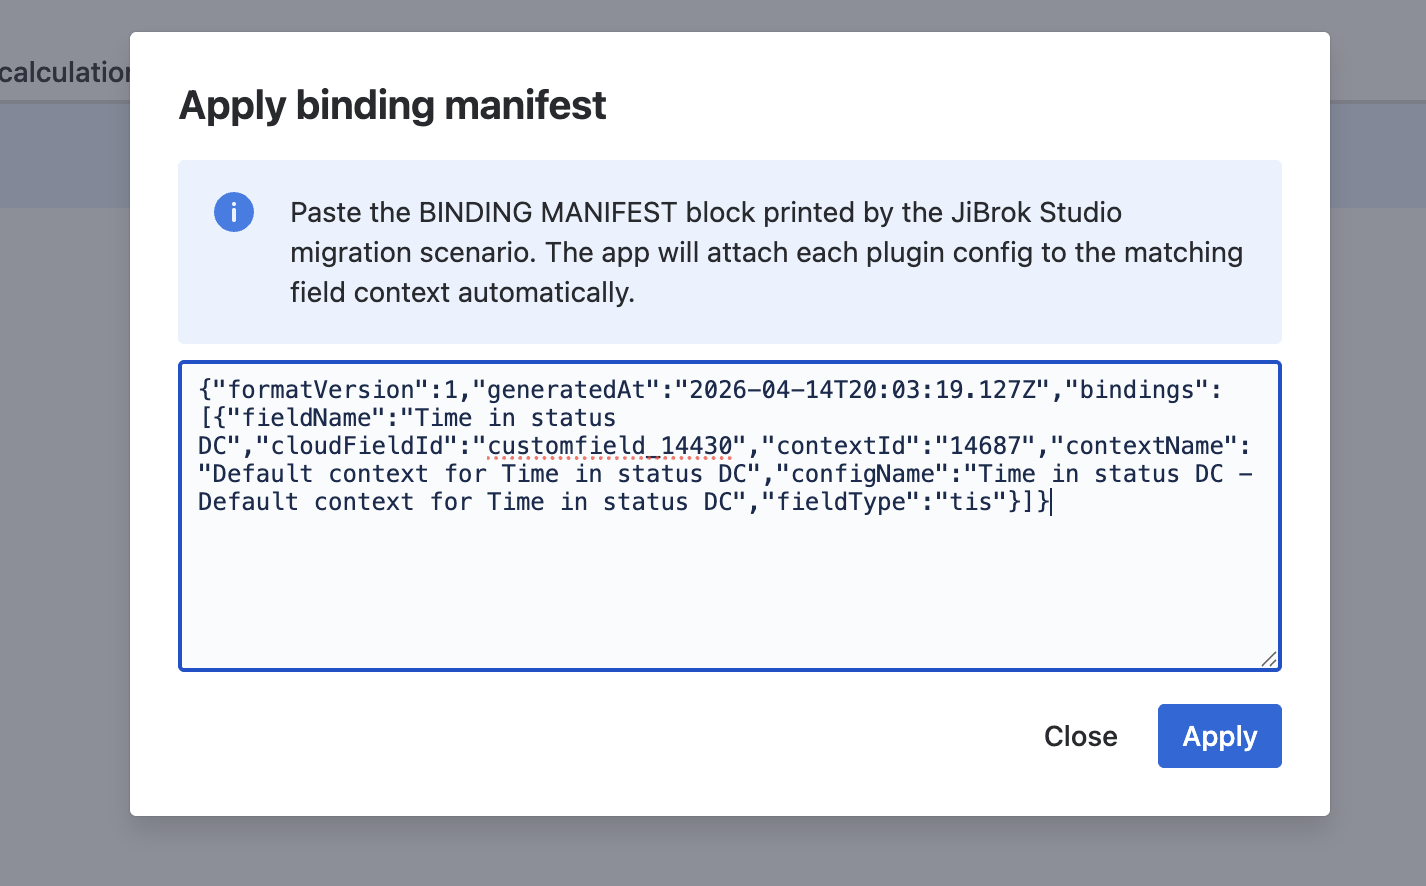
Apply binding manifest modal - the app resolves each entry and attaches the matching configuration.
Path B · Manual binding
Use the Step 3 · Plugin config bindings table on the DC Migration page as a checklist. For every row:
- In Jira Cloud open Administration → Work items → Custom fields and find the field.
- Open the field’s context and click Edit custom field config.
- In the Field Setting dropdown, pick the plugin configuration with the name shown in the DC table (for example
Time in status DC - Default context for Time in status DC) and click Save.
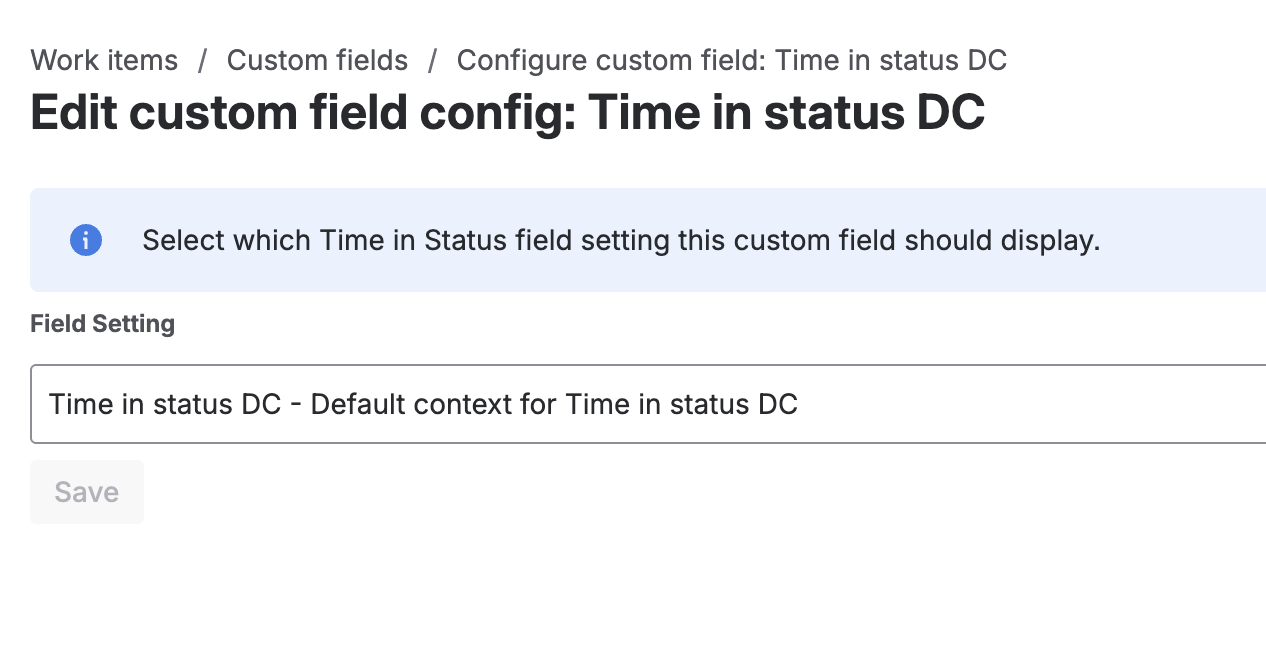
Manual binding: pick the same configuration name the DC Migration page shows for this context.
Repeat for every (field, context) combination listed in the DC table. The scenario log also prints a direct URL for each context, which you can paste into the Cloud browser to jump straight to the right page.
Verification checklist
Run through this checklist once Step 3 is done:
- JCMA reports COMPLETE for the Time in Status app (or the manual JSON import finished without errors).
- Every supported field appears in Jira Cloud → Custom fields with the expected Forge type (Time in Status / Timer / Stopwatch / Calendar Select).
- Every context of every migrated field has its Field Setting populated and matches the Step 3 · Plugin config bindings table on the DC Migration page.
- An issue in a migrated project opens and the Time in Status / Timer / Stopwatch fields render values (or the expected panels appear on the issue screen).
- The DC Migration page’s Migration warnings box is either empty or contains only entries you have already acknowledged (unsupported helper fields, intentional screen renames).
Troubleshooting
- Scenario warns
Skip <field>: unknown type <key>. The field type has no Cloud equivalent - see Unsupported field types. - Scenario warns
<field>: screen "<name>" not found. A screen was renamed (or does not exist) on the Cloud side. Add the field to the correct screen manually after the run. - Scenario warns
<field>: no projects for "<ctx>". A project key differs between DC and Cloud, so the context cannot be created. Create the context manually in Cloud once the field itself exists. Apply binding manifestbutton is missing in TIS Cloud. The Cloud app is not on the latest Forge build. Upgrade Time in Status Cloud from the Marketplace and reload the settings page.Import Settingsin Cloud reports status-ID mismatches. You chose the manual JSON path against instances with different status IDs. Either realign the statuses or rerun Step 1 via JCMA, which remaps status IDs automatically.- Need to re-run after a failure. Rerun the same script in JiBrok Studio. Already-created fields, contexts, screen assignments and bindings are detected and skipped - the scenario is idempotent by design.
- Two runs produced duplicate contexts. The scenario matches contexts by name; if a context was renamed between runs it will be recreated. Remove the duplicate in Jira Cloud and re-apply the manifest.
Getting help
If a step does not behave as described, the DC Migration page is the authoritative view of what your instance contains and what the scenario will produce. Capture a screenshot of the page’s Fields in this instance section and of the scenario log, then contact JiBrok support - we can reproduce most issues from those two inputs alone.


