 Message Field for Jira Cloud
- How Create Modules Work
- Portal Subheader (Create)
- Portal Footer (Create)
- Create Module Constraints
- Using Form Data in Templates
- Display Conditions for Create Modules
- Practical Examples
- Next Steps
Display panels on the request creation form - before the customer submits their request.
How Create Modules Work
Create modules use Forge UI Modifications (UIM) to access form data. Unlike regular JSM modules that work with existing issues, create modules work with form field values as the user fills them in.
| Data Source | Regular JSM Modules | Create Modules |
|---|---|---|
| Issue fields | issue.fields.* |
Not available |
| Form values | Not available | fields.* |
| Current user | currentUser.* |
currentUser.* |
| Request type | From issue | From context |
Portal Subheader (Create)
Location: Below the title on the request creation form
Configuration
- Create new configuration
- Select JSM Portal Subheader (Create) as Display Module
- Select at least one portal (required)
- Configure request types filter (optional)
- Add message content
- Save
Use Cases
- Pre-submission instructions
- Request type specific guidance
- Important notices before submission
Example
<div style="padding: 12px; background: #DEEBFF; border-left: 4px solid #0052CC;">
  <strong>Before You Submit:</strong>
  <ul>
    <li>Provide a clear, detailed description</li>
    <li>Include screenshots if applicable</li>
    <li>Check our <a href="/kb">Knowledge Base</a> first</li>
  </ul>
</div>
Portal Footer (Create)
Location: Bottom of the request creation form, above submit button
Configuration
- Create new configuration
- Select JSM Portal Footer (Create) as Display Module
- Select at least one portal (required)
- Configure request types filter (optional)
- Add message content
- Save
Use Cases
- Terms and conditions
- Submission agreements
- Legal notices
Example
<div style="padding: 12px; background: #F4F5F7; border-radius: 4px; font-size: 12px;">
  By submitting this request, you agree to our
  <a href="/terms">Terms of Service</a> and
  <a href="/privacy">Privacy Policy</a>.
</div>
Create Module Constraints
JSM Create modules have specific limitations:
| Feature | Available | Notes |
|---|---|---|
| Display JQL | No | No issue exists yet |
| User Fields Filter | No | No issue fields to check |
| Issue Data | No | Use fields.* for form values |
| Portals Filter | Required | Must select at least one portal |
| Request Type Filter | Yes | Filter by request types |
| Display Condition | Yes | Use fields.* for form values |
| Linked Issues | No | No issue to link from |
| JQL Data Source | No | Use Message Only |
Using Form Data in Templates
Access form field values as the user fills them:
{% if fields.summary %}
<p><strong>Summary:</strong> {{ fields.summary }}</p>
{% endif %}

{% if fields.description %}
<p><strong>Description preview:</strong></p>
<div>{{ fields.description | truncate(200) }}</div>
{% endif %}

{% if fields.priority %}
<p><strong>Priority:</strong> {{ fields.priority.name }}</p>
{% endif %}
Note: Field values update dynamically as the user types.
Display Conditions for Create Modules
Use fields.* instead of issue.fields.*:
{# Show only when priority is High #}
{{ fields.priority.name == 'High' }}

{# Show only when specific label is added #}
{{ 'urgent' in fields.labels }}

{# Show when summary contains keyword #}
{{ 'password' in fields.summary | lower }}
Practical Examples
Request Type Guidance
Show instructions specific to the selected request type.
Module: Portal Subheader (Create) Portals: IT Support Portal
<section-message appearance="info" title="Helpful Tips">
  {% if fields.summary and ('password' in fields.summary | lower) %}
    For password issues, try the self-service reset first at /reset-password
  {% elif fields.summary and ('vpn' in fields.summary | lower) %}
    Include your location and VPN client version in the description
  {% else %}
    Please provide as much detail as possible to help us resolve your issue quickly
  {% endif %}
</section-message>
Priority Warning
Alert when high priority is selected.
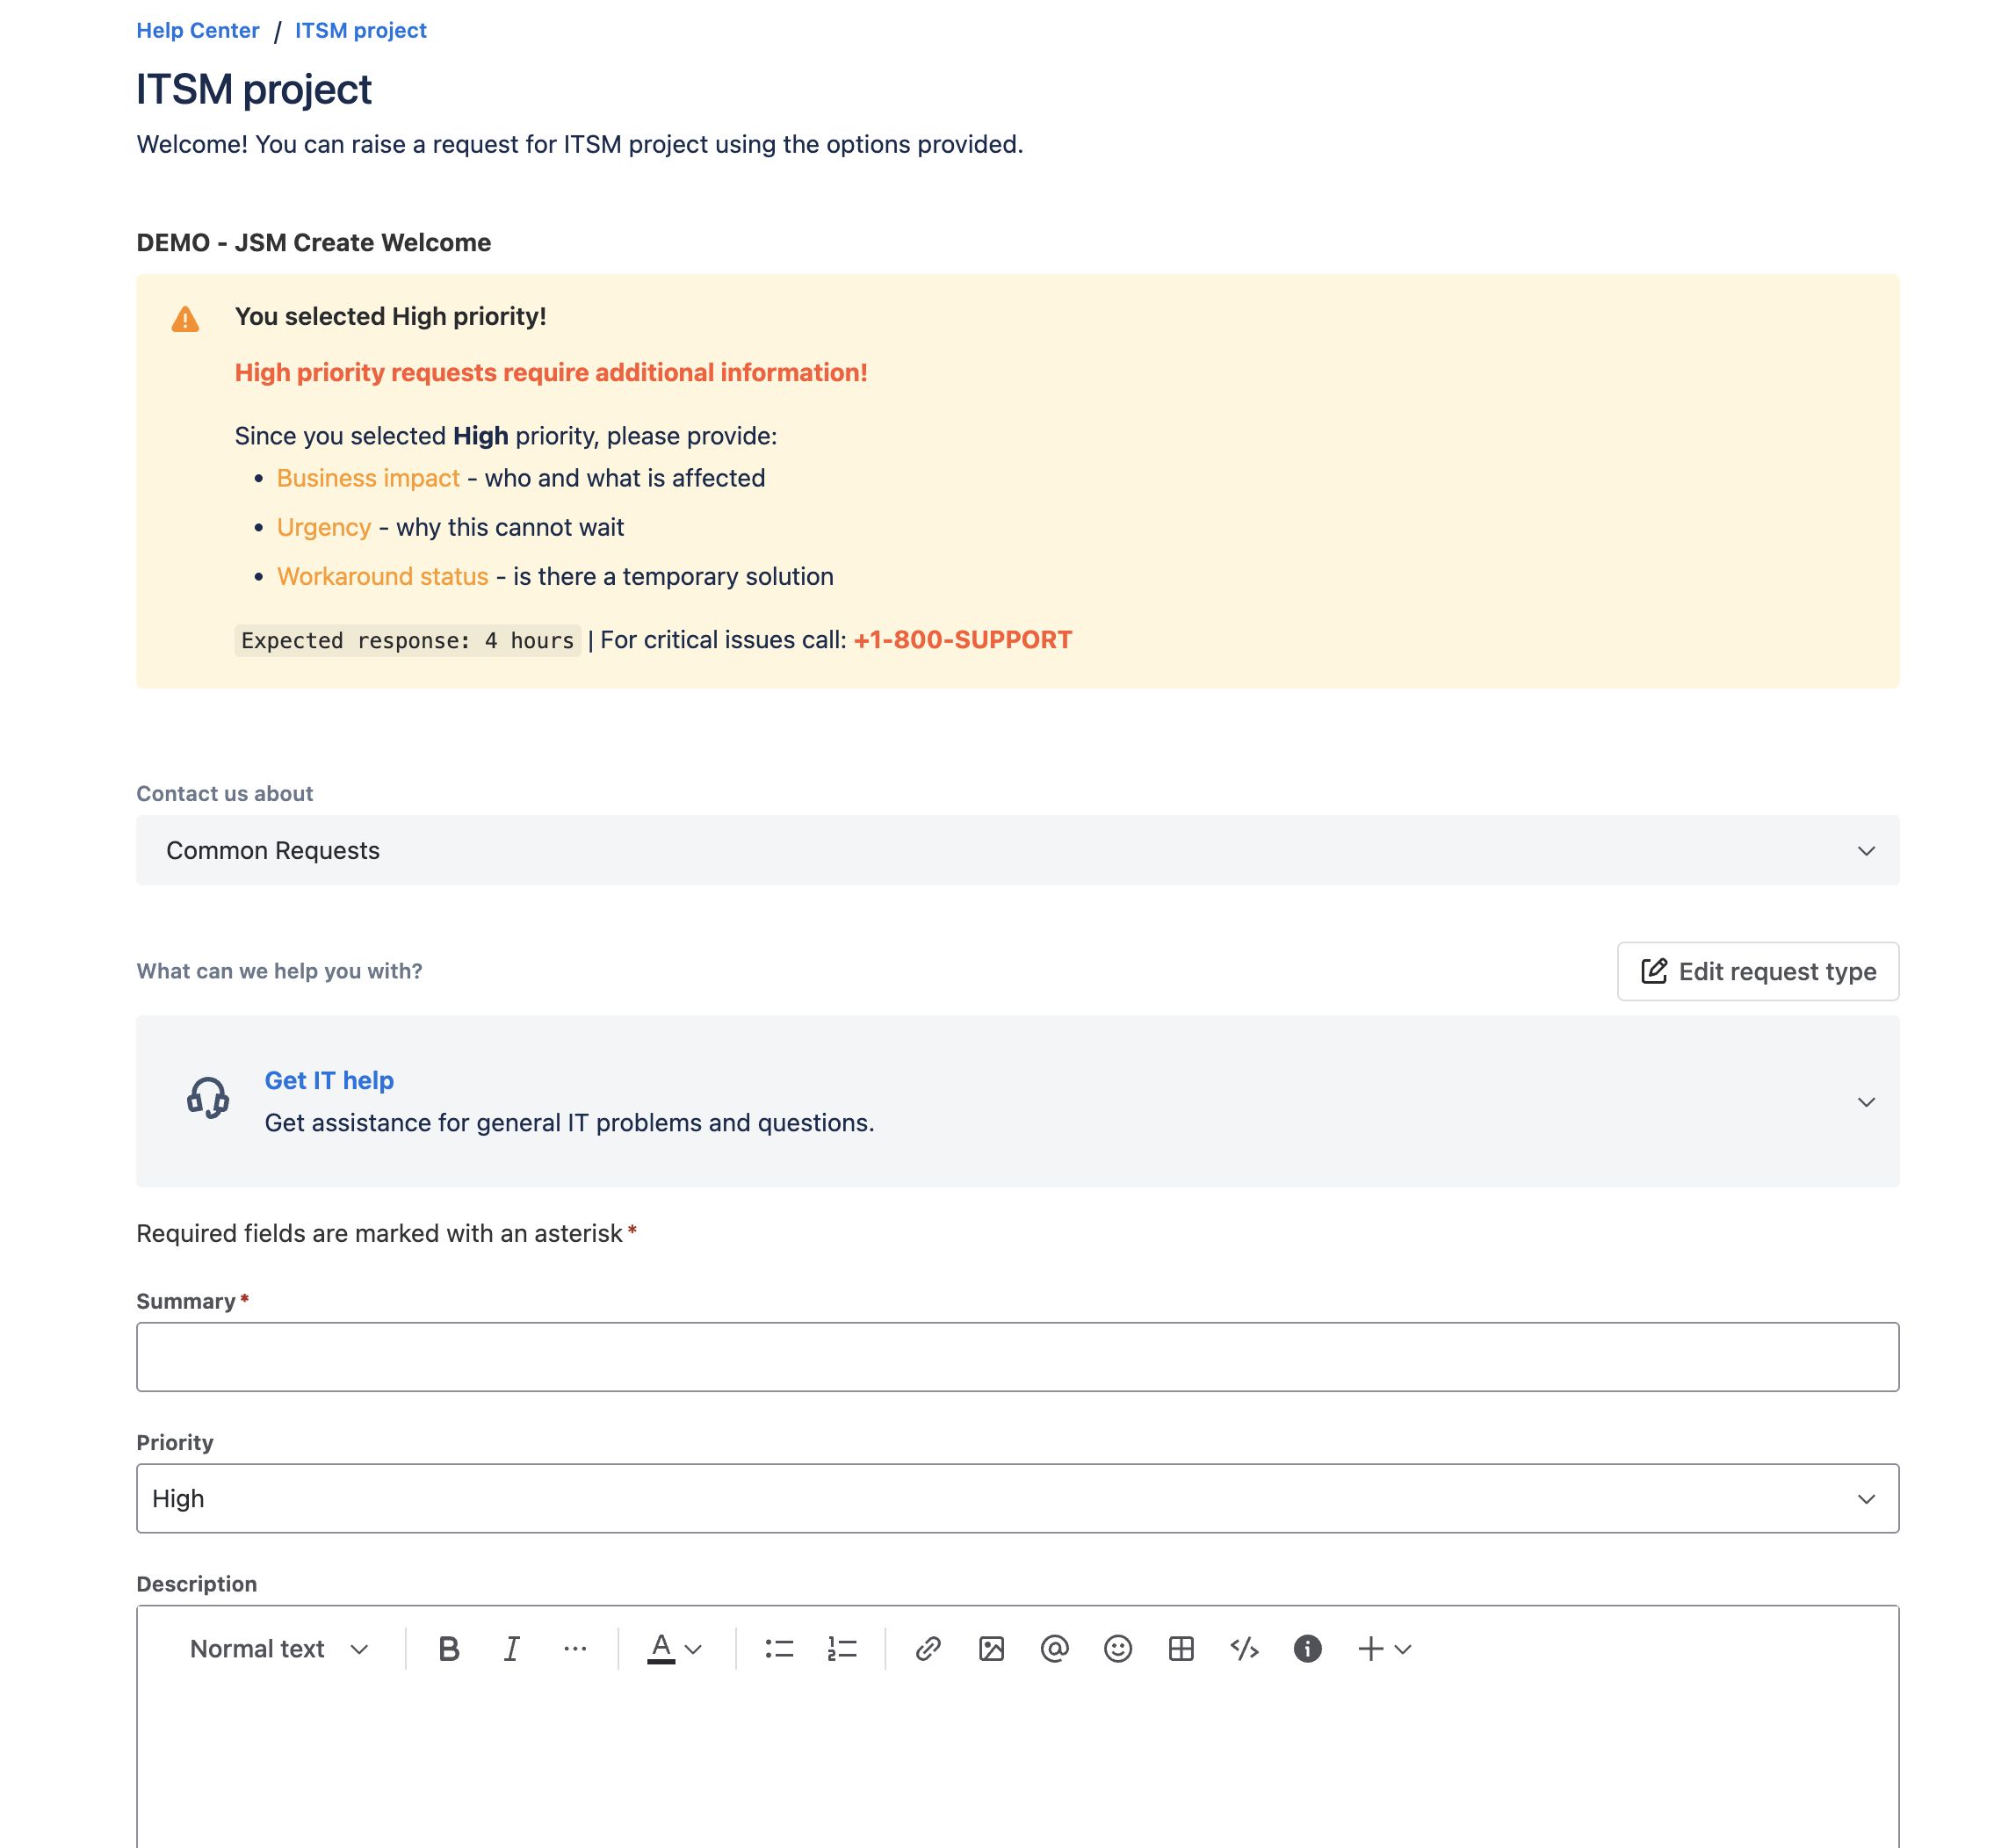
Module: Portal Subheader (Create) Display Condition: ``
<section-message appearance="warning" title="High Priority Request">
  High priority requests require manager approval and may incur additional charges.
  Please ensure this truly requires urgent attention.
</section-message>
Terms Acceptance
Display terms at the bottom of the form.
Module: Portal Footer (Create) Portals: All support portals
<div style="padding: 16px; background: #F4F5F7; border-radius: 4px; margin-top: 16px;">
  <p style="margin: 0 0 8px 0; font-size: 12px; color: #6B778C;">
    By clicking "Send", you confirm that:
  </p>
  <ul style="margin: 0; padding-left: 20px; font-size: 12px; color: #6B778C;">
    <li>The information provided is accurate</li>
    <li>You have reviewed our <a href="/kb">Knowledge Base</a></li>
    <li>You agree to our <a href="/terms">Terms of Service</a></li>
  </ul>
</div>
Next Steps
- JSM Integration - Main JSM documentation
- Context Filters - Filter by request types and portals
- Display Conditions - Dynamic visibility conditions
- Templates - Template syntax reference
- Use Cases - Portal - More JSM portal examples


