 Timer field | SLA for Jira Cloud
In this guide, we will create a timer that will track the time to resolution.
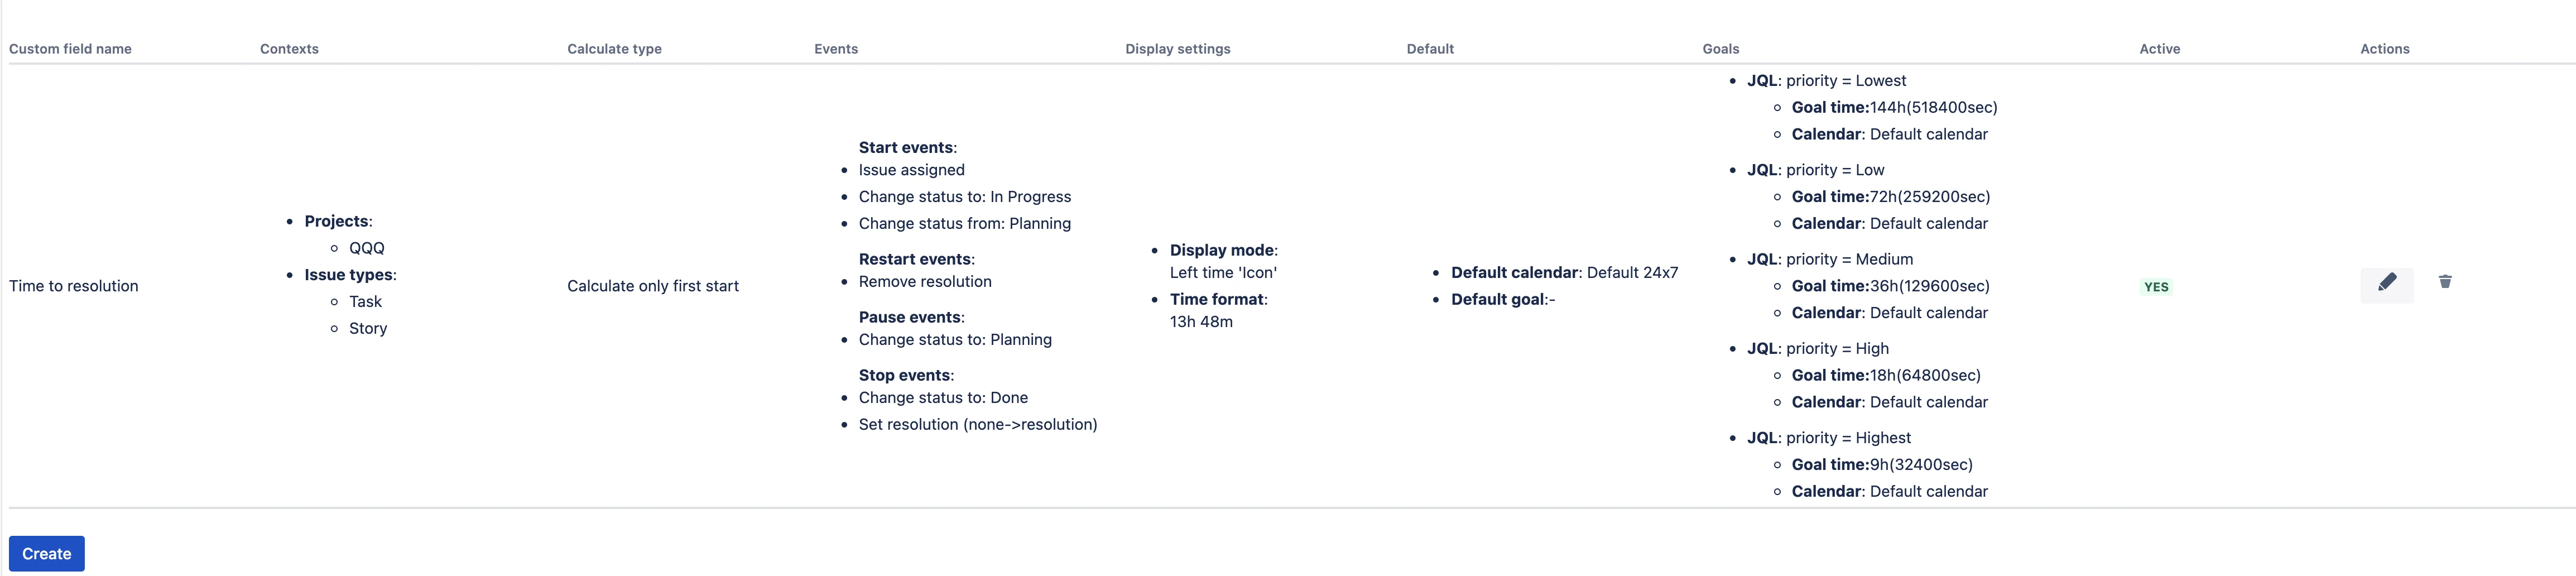
Time to resolution:
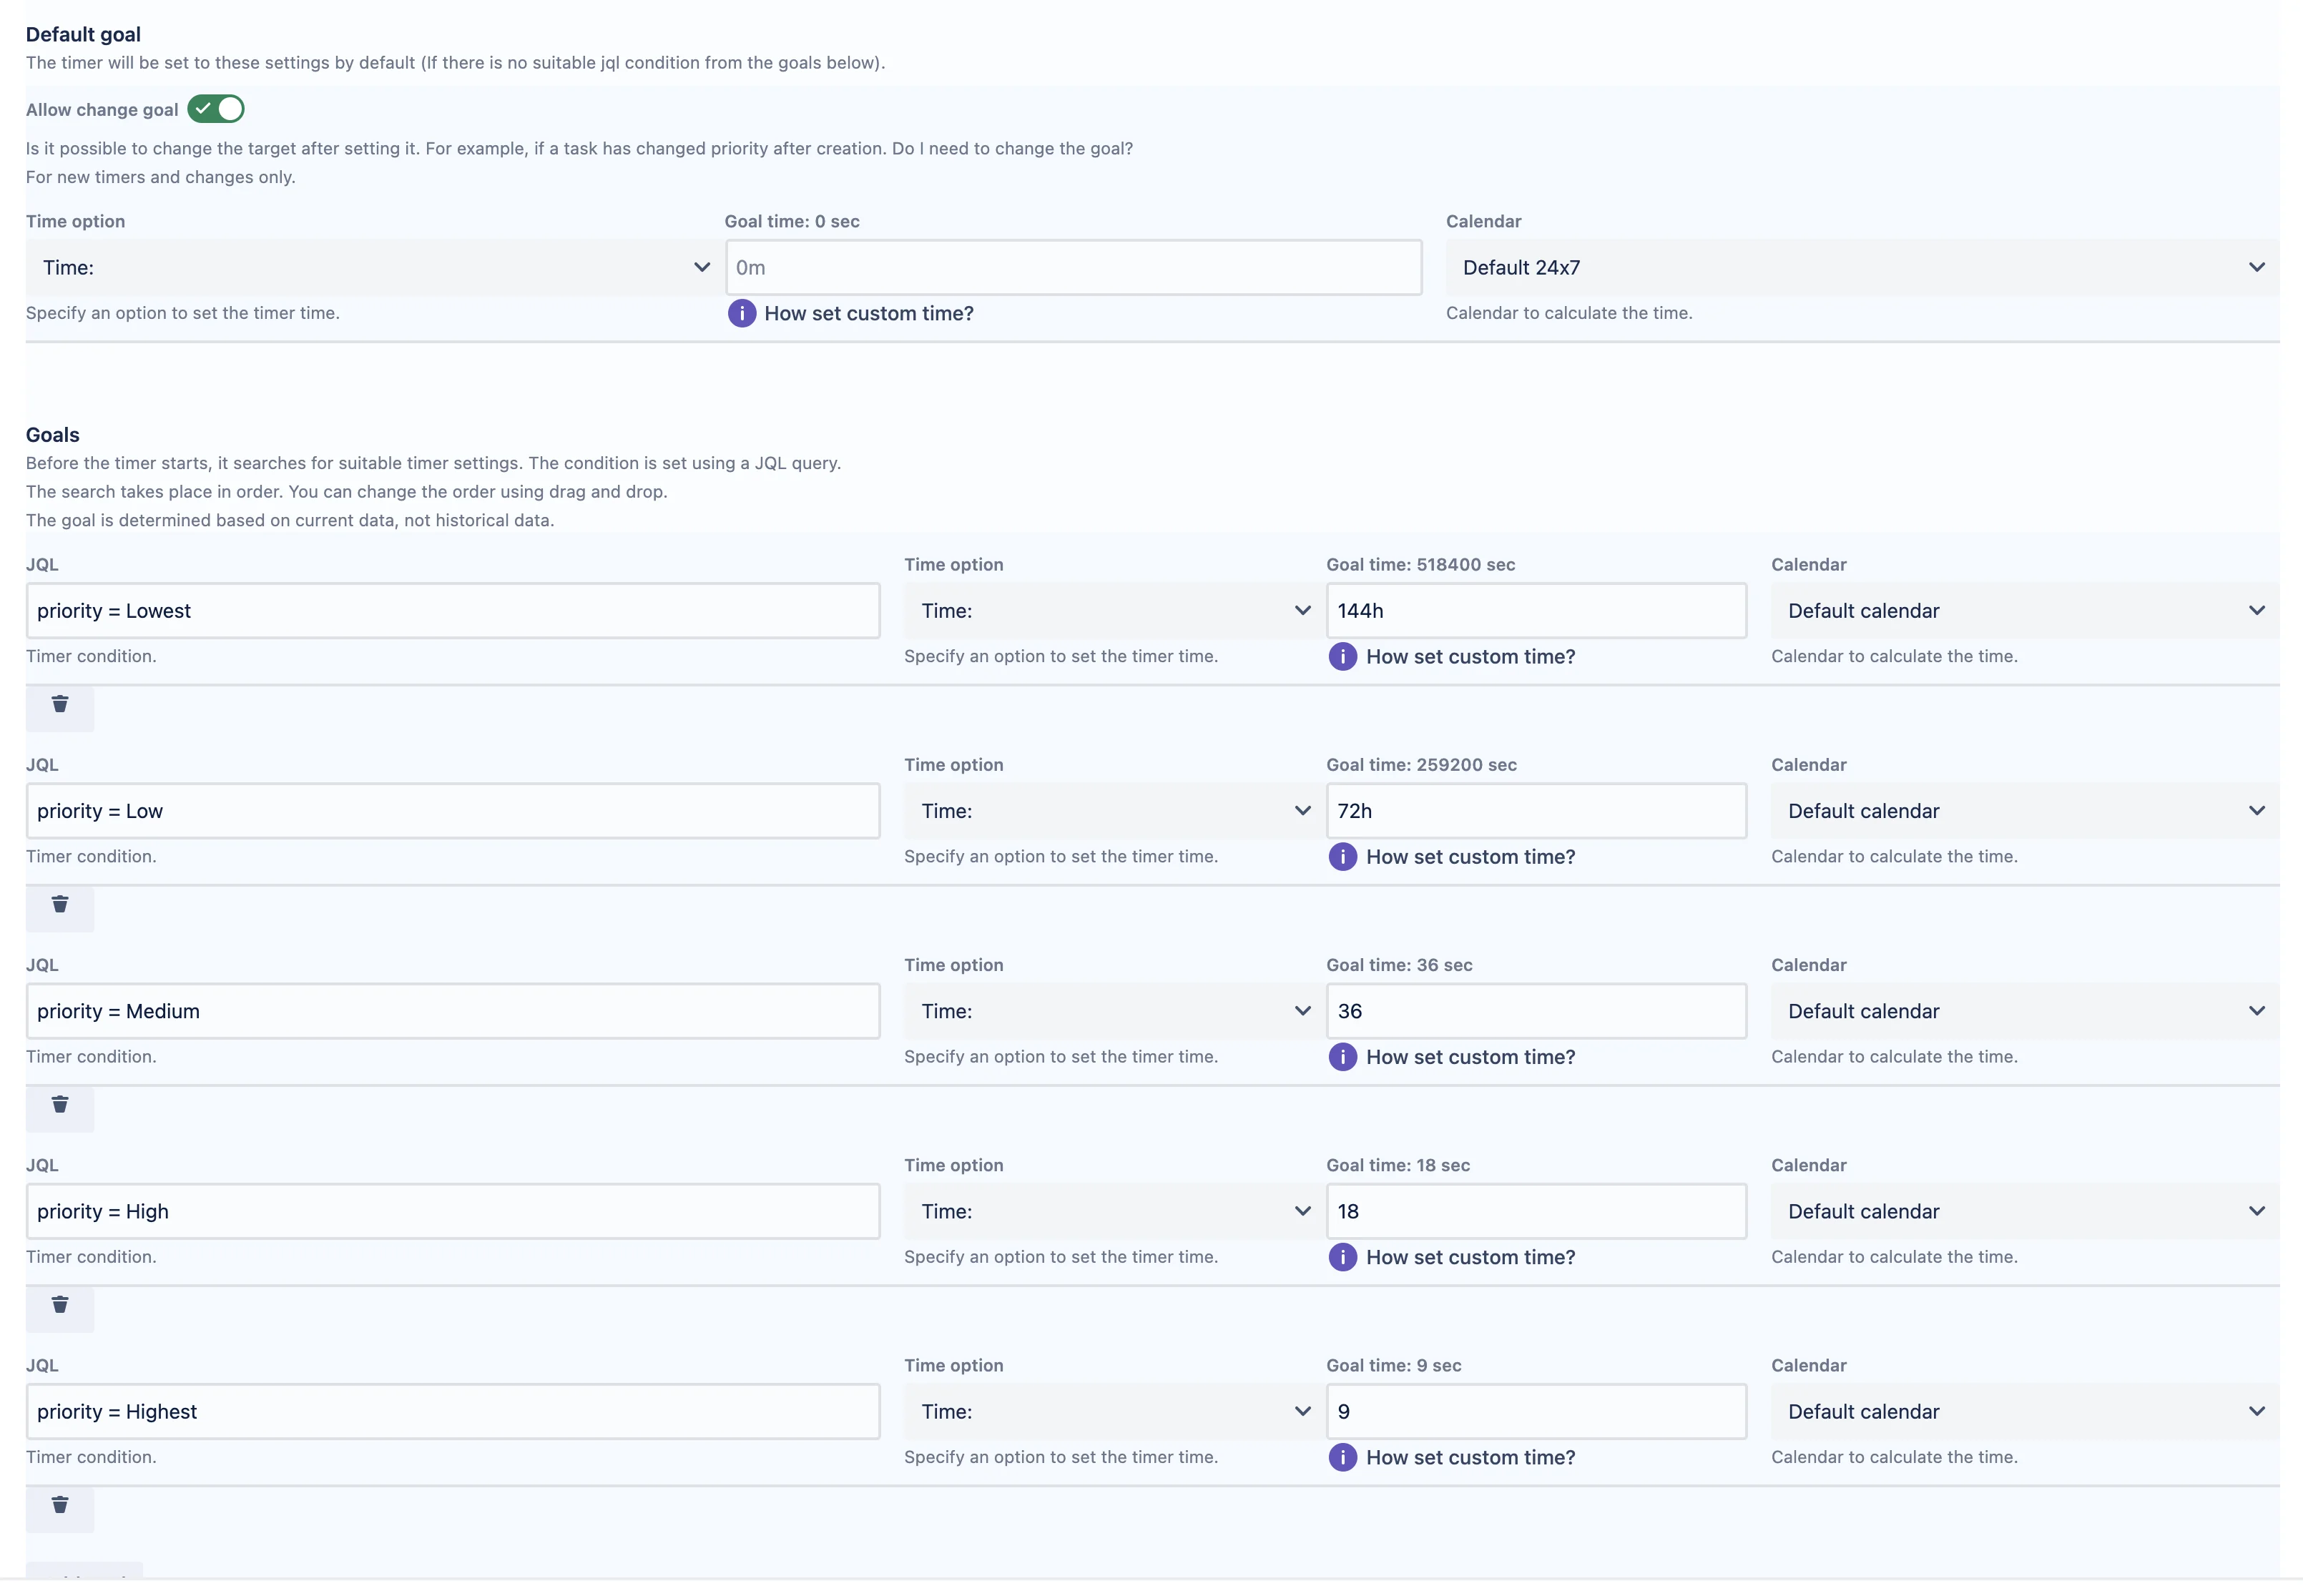
- The time will be calculated according to the working calendar.
- The time it takes to resolve the request will depend on the priority of the issue.
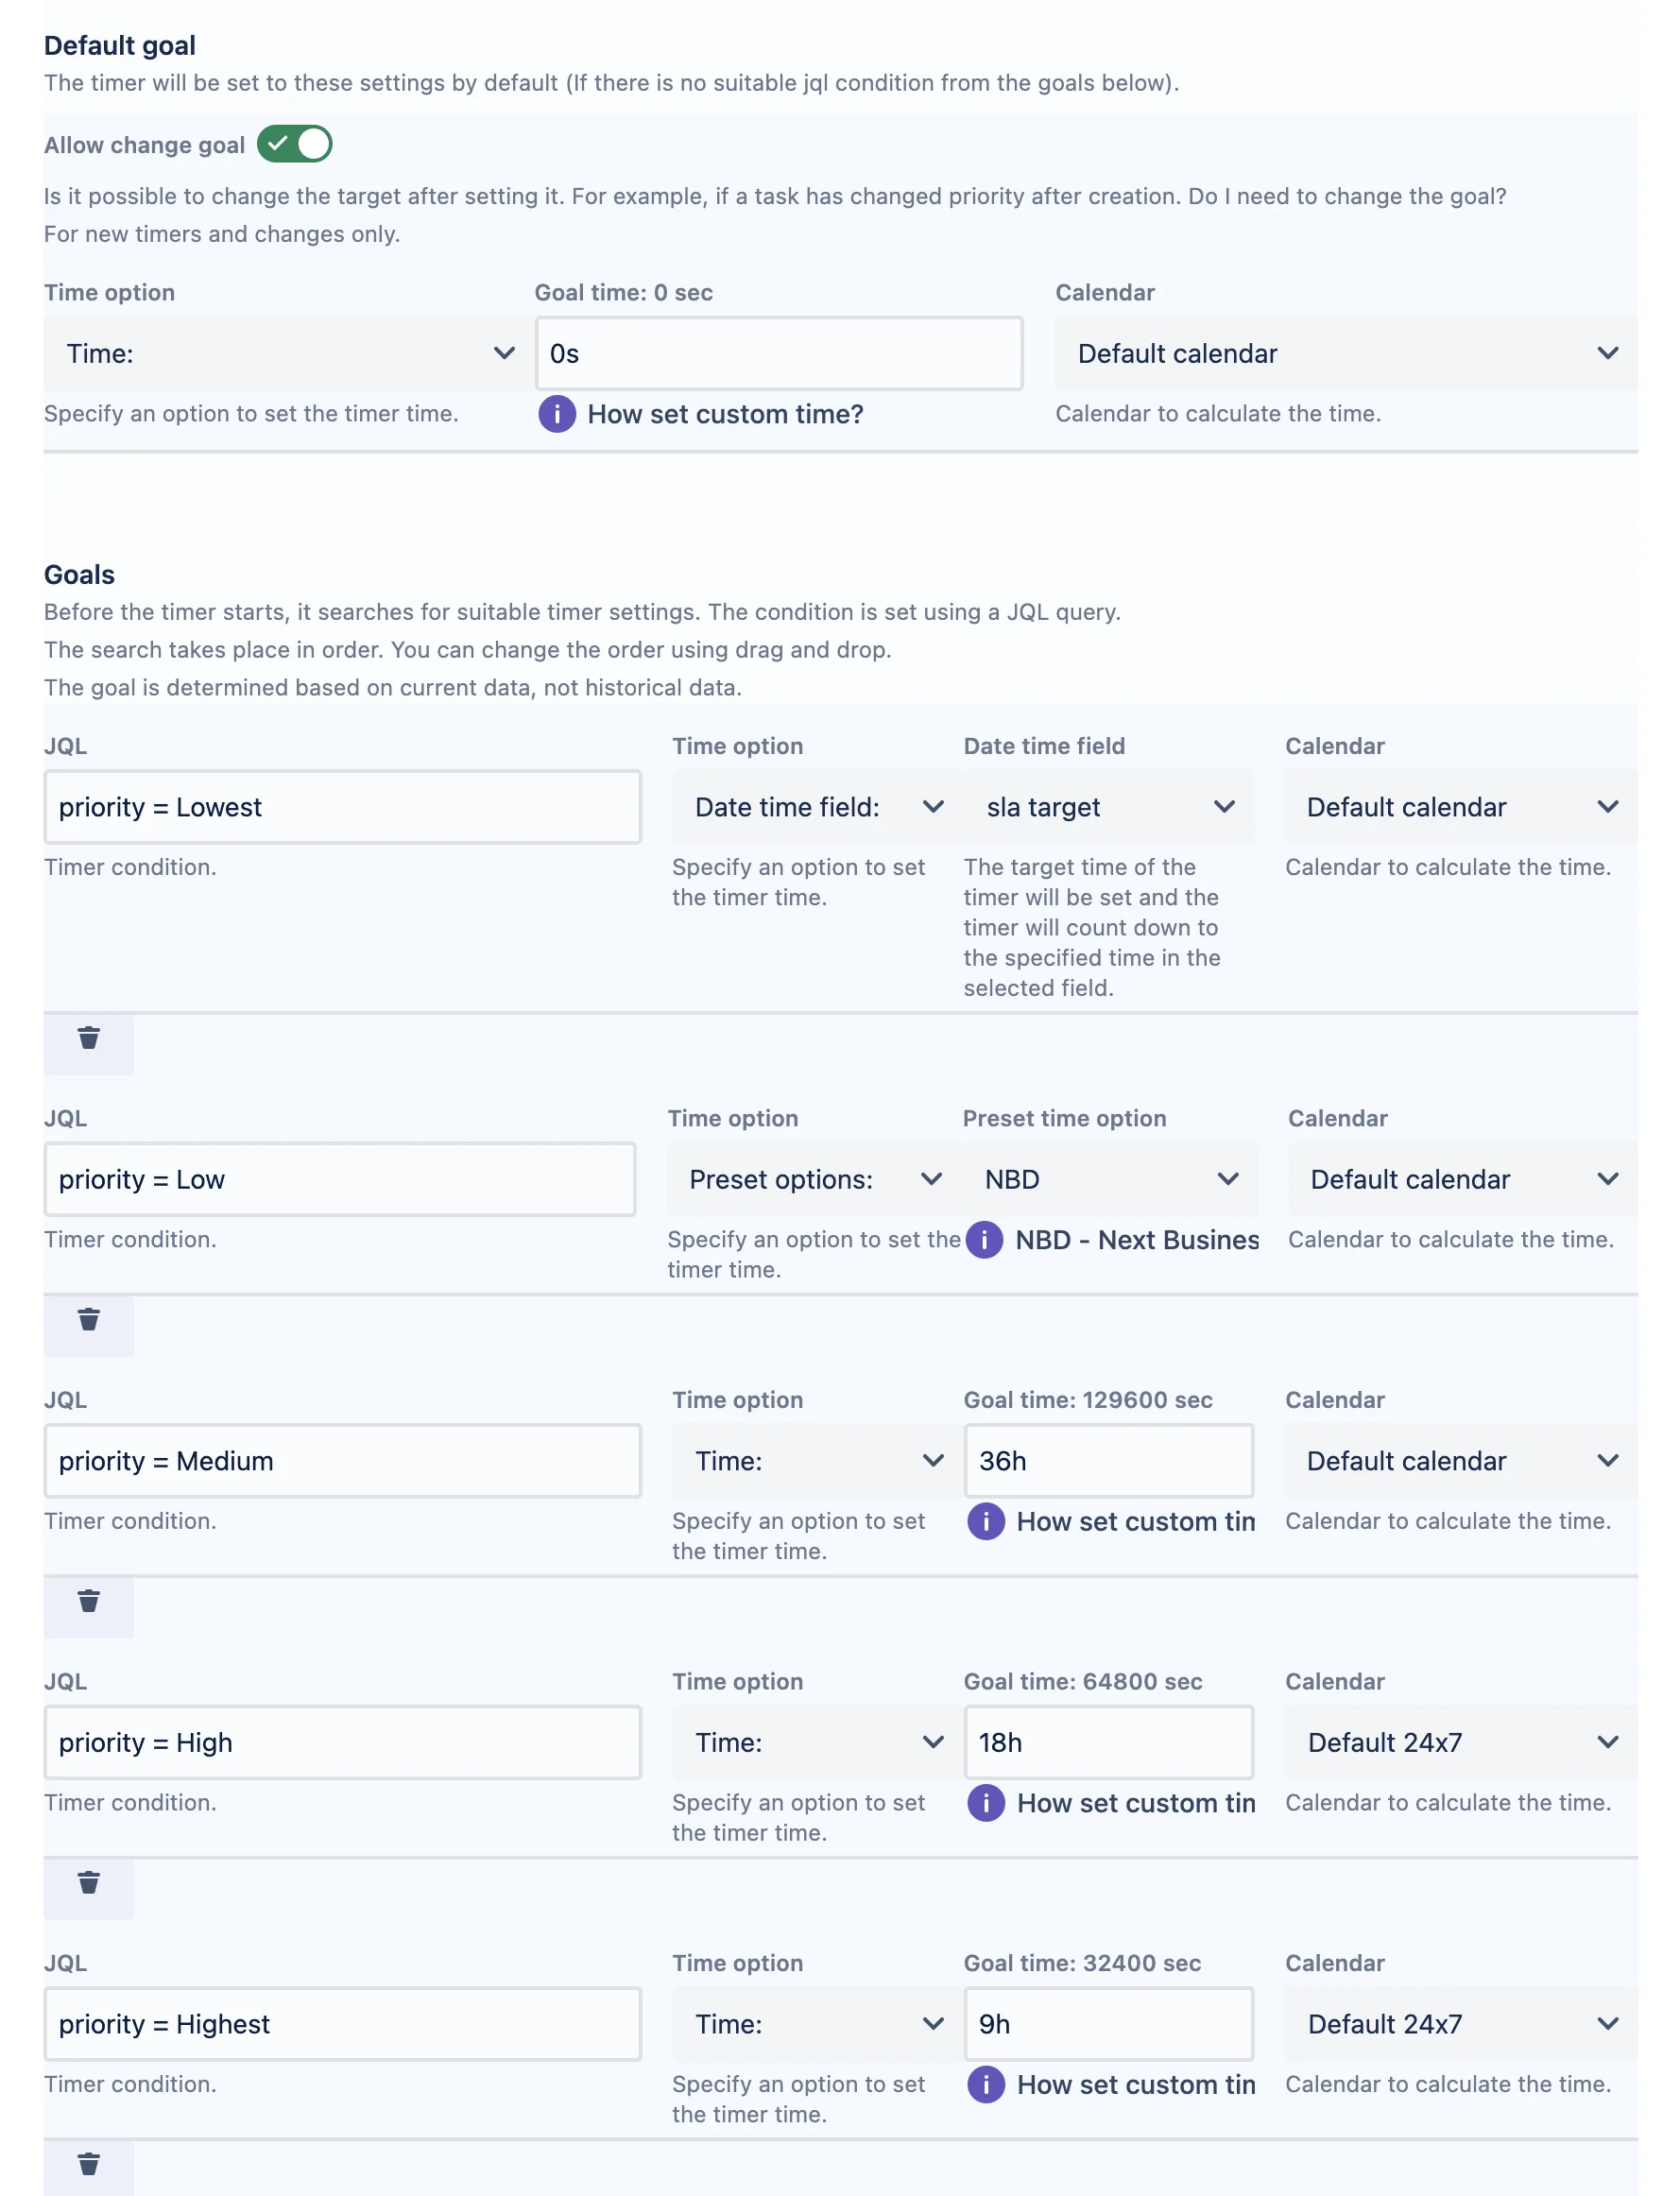
- Priority Lowest - 144h
- Priority Low - 72h
- Priority Medium - 36h
- Priority High - 18h
- Priority Highest - 9h
- The timer can be paused by putting the issue in Hold status.
- The timer is stopped when you close the issue or set the resolution.
- The timer restarts when the resolution is removed.
Open page to create fields
- In the top bar of the navigator, there is an “Apps” menu where you need to select the “Timer field” application. This will open the Application Settings menu.
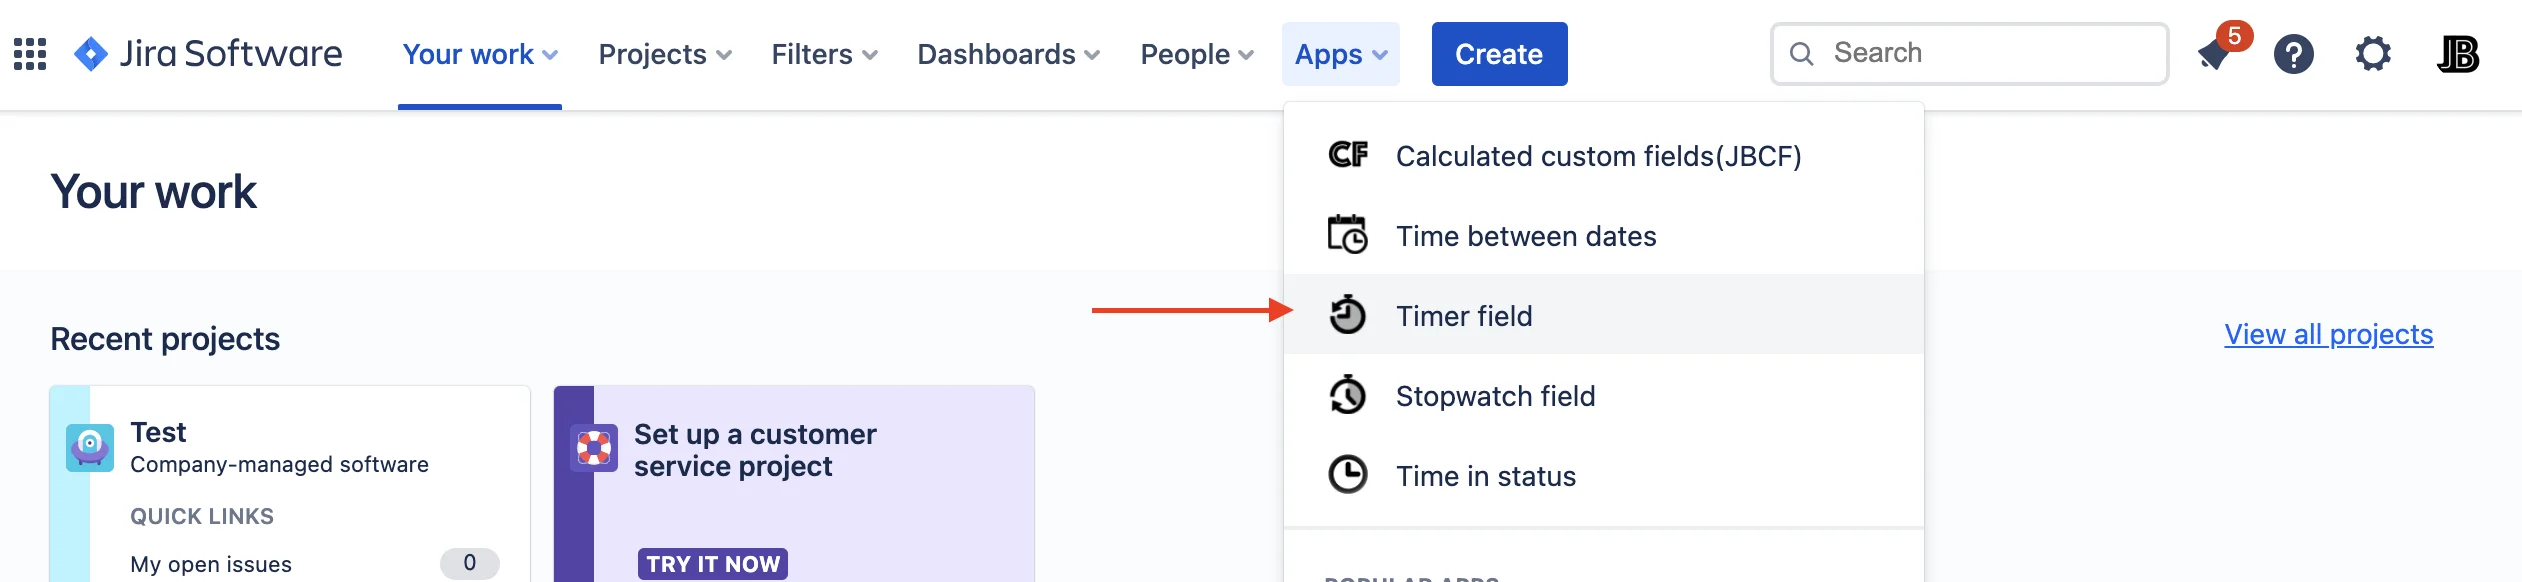
- Then you need to go to the “Timer fields” tab

Create Timer/SLA for “Time to resolution”
- Click “Create” to create a new Timer.

- General information
- Provide a name for the timer. A field will be created with the specified name. This name will also be used in JQL queries.
- Set this field to active. Otherwise, it will not work and will only save the settings.
- Contexts
- Provide contexts for this field. The following settings will only apply to issues from the specified projects and specified issue types.

- You can refine the goals below with JQL conditions.
- Provide contexts for this field. The following settings will only apply to issues from the specified projects and specified issue types.
- Set Calculate type to “First start”.
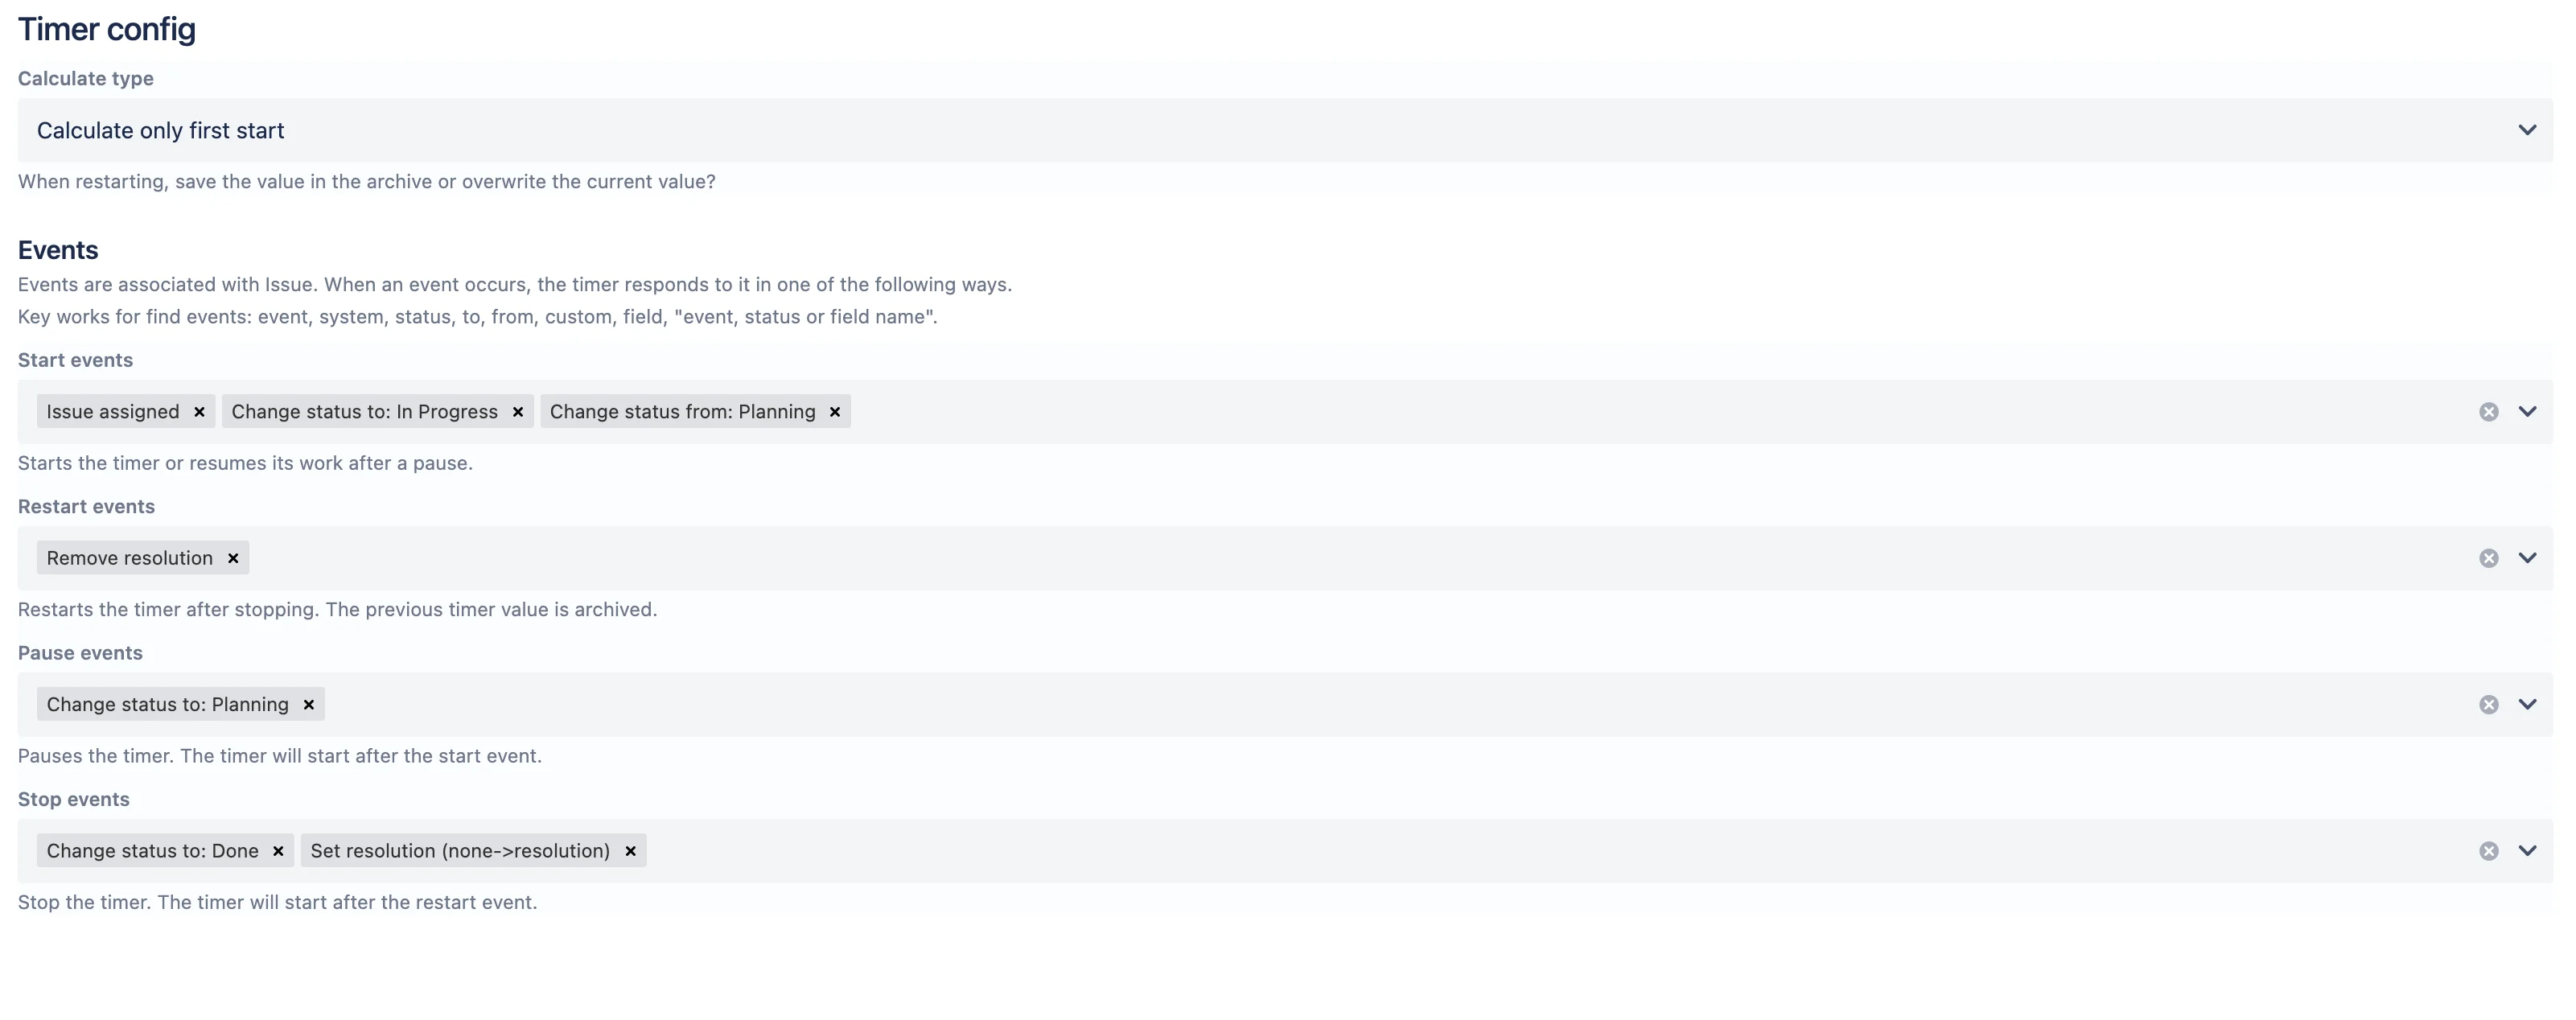
- Events
- Start events:
- The timer will start when the issue transitions to “In progress”. Add “Change status to: In progress”.
- (see Pause events) When an issue returns from Hold status, then the timer must be started. Add “Change status from: Hold”.
- When an issue is assigned (assignee changes from Null (Empty) to user). Add “assigned issue”.
- Restart events:
- If the resolution is removed from the issue, then the timer starts the countdown again. Add “Remove resolution”. (If you do not need to restart the timer, then you need to use a pause instead of a restart.)
- ❓It can be omitted if you are only interested in the time of the first resolution of the issue (Calculate type - “First start”). There will soon be new types to handle cases where requests are re-submitted. If you are interested in the total time, then you need to use the “Pause” events to pause the calculation. After triggering “Stop”, the calculation is terminated completely.
- If the resolution is removed from the issue, then the timer starts the countdown again. Add “Remove resolution”. (If you do not need to restart the timer, then you need to use a pause instead of a restart.)
- Pause events:
- The team can send the issue to Hold status. While the issue is in this status, the timer needs to be stopped. Add “Change status to: Hold”.
- Stop events:
- We stop the timer when the issue closes or a solution is established for it. Add “Change status to: Closed”. Add “Set resolution”.
- Start events:
- Display settings
- Configure the settings for displaying data in the field. It will not affect the actual value or sorting by field.

- Configure the settings for displaying data in the field. It will not affect the actual value or sorting by field.
- Time settings
- Default calendar - You can set a working calendar by which the timer will be considered. If left blank, the time will be considered 24/7
- Default time (Default goal) - Time for which the timer is set if it is not possible to select a goal.
- The timer time depends on the priority. If the issue does not have a priority or it does not match any of the conditions, then the default goal of 0 will be selected. A zero goal does not start the timer.
- The target time will be determined by the priority of the issue. For each condition (priority), you need to add a goal.
- Create goals by priorities: see screenshots
- JQL - Condition for the application of this Goal. If none of the conditions match the issue then the default goal will be applied.
- Time option:
- Time - You can specify the time manually. After the start, the timer will be set to the specified time.
- Date time field - The timer will count down the time from the start to the date in the specified issue field.
- Preset options:
- NBD (Next business day) - The timer will count down the time from the moment of the start to the end of the next working day.
- An example of a combination of different conditions:
Goals and conditions for “track the time to resolution”
- Click “Save”
- After a successful save, the data synchronization process will start. It includes calculating historical values and starting tracking of active timers. Depending on the number of issues, the first synchronization may take some time. You can follow the synchronization status in the “Service info” tab.

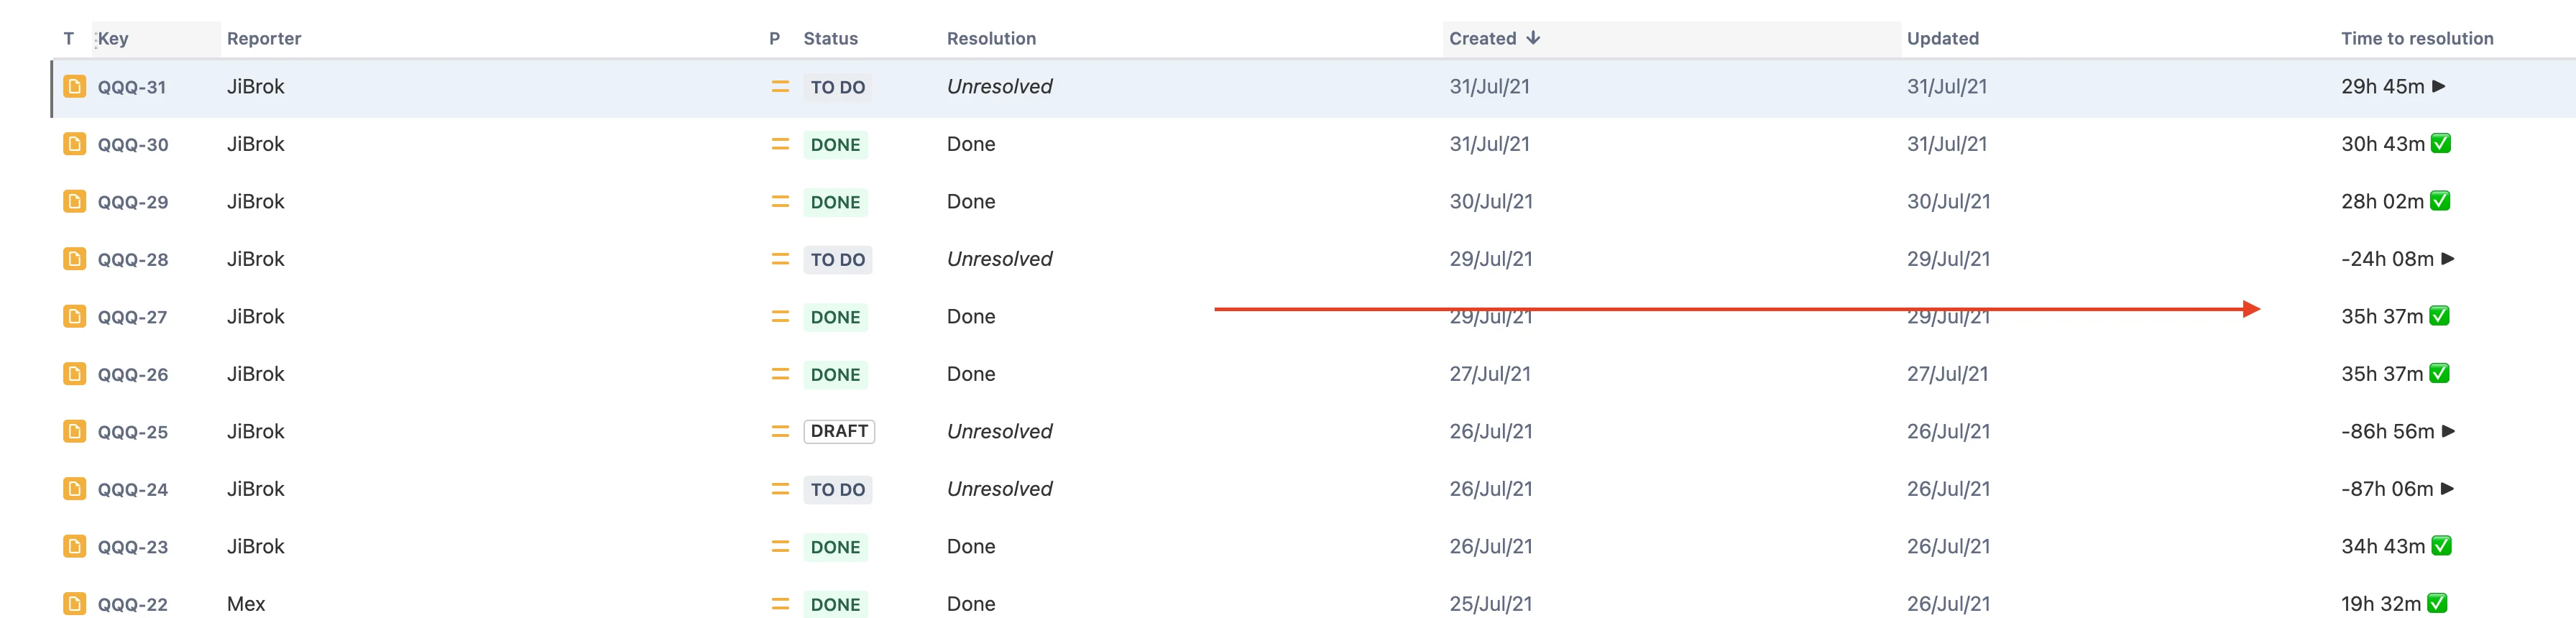
- After you create the field, you can go to the “Start Page” tab. The examples will be updated on it and there will be links to demo JQL queries.
- You can also work with this field as with any other. You can display it on screens, in reports, search and sort data by it.
- The data in the field will be updated periodically and whenever the issue is updated. The frequency of automatic updates is now automatically detected. The less time remaining, the more frequent the updates will be.
- Current intervals of time updates:
- 1-5min: every 1 min
- 5min-2h: every 5 min
- 2h-12h: every 15 min
- 12h-24h: every 30 min
- 24h-7d: every 1h
- 7d-14d: every 2h
- 14d+: every 4h
- Current intervals of time updates:


